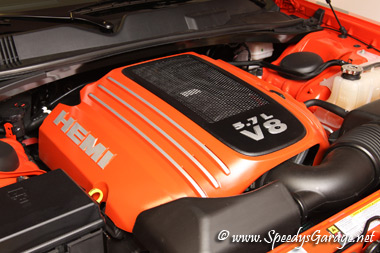
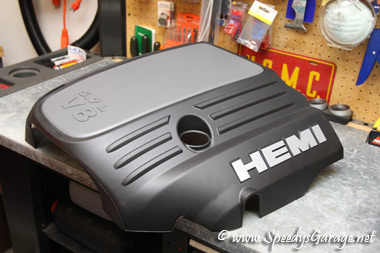
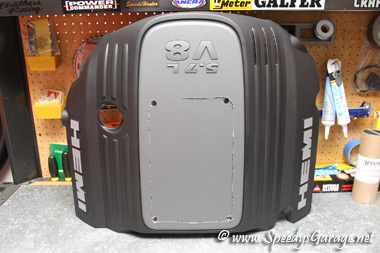
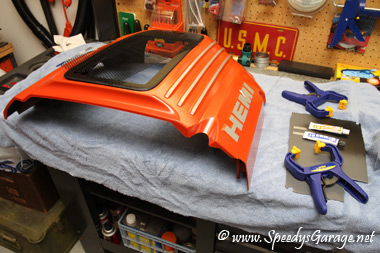
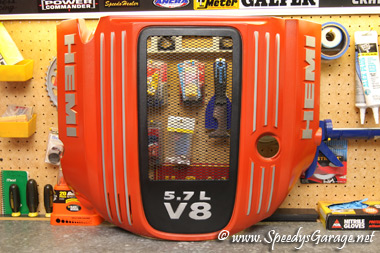
Engine Cover
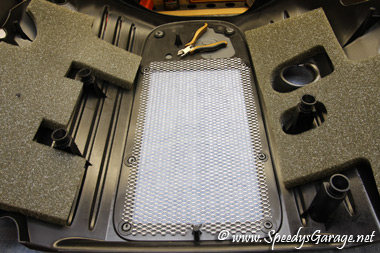
I didn’t really care for the bland engine cover Dodge put over the 5.7L motor, however when removed all the wires and hoses were exposed which looked worse. After looking around on the web I saw where several folks had painted the cover and it really made a difference in the aesthetics. I decided to go a step further and open up the cover to allow that engine heat to escape. Opening up the cover will also work in hand with a future modification I have planned….. installing functional hood scoops.
I have to thank a member from the ChallengerTalk Forums, Challenger5.7, for giving some great tips for completing this mod. I will warn this is not for the faint of heart if you want it to look perfect. This mod requires a lot of patience to get right, but if you follow this guide yours should turn out great. Just for comparison I checked with a local painter who quoted me $150.00 to paint the cover, and that would have just been a solid orange without the nifty lettering work. I was able to do this myself for about $60 in paint and supplies with a more detailed implementation to boot. Your cost may vary some depending on what tools you already have on hand.
This article will cover painting as well as modifying the engine cover. I will separate the article in to two parts to make it easier to follow for those that do not wish to modify the cover. However, I’d recommend doing so to let the engine heat escape.
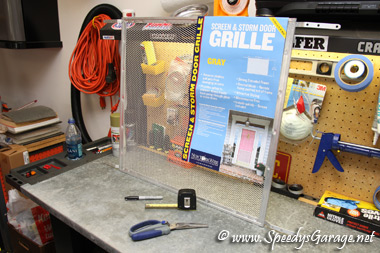
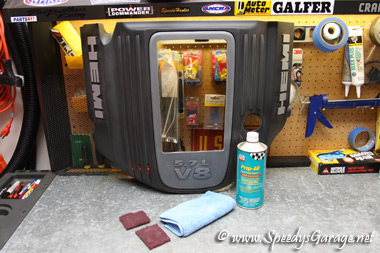
For this modification you’ll need:
To paint the engine cover:
Prep-All or Prep Wipes
Duplicolor Adhesion Promoter CP199 (1 Can)
Duplicolor Etching Primer DAP1690 (1 Can) – required if you want to open up the engine cover
Duplicolor Semi Gloss Black Acrylic Enamel DA1603 (1 Can) – required to paint the center black
Duplicolor Hemi Orange Engine Enamel DE1652 (1 Can)
Duplicolor Clear Acrylic Enamel DA1692 (1 Can)
Testors Silver Model Paint 1146
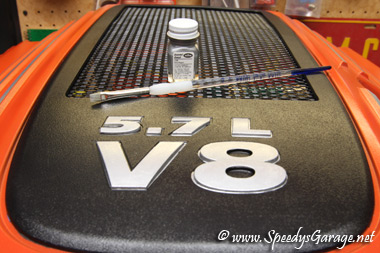
1/4" Artist Paint Brush Natural Bristle (get a good one)
1.5” Painter’s tape
3M Red Scuff Pad
News paper
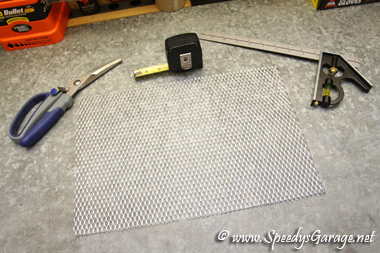
X-acto Knife with sharp blades
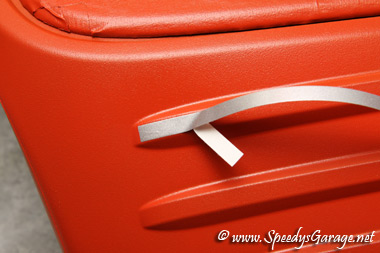
1/4" Silver pin stripe

To modify the engine cover:
Keyhole saw or other small cutting tool with fine tooth blade
Dremel tool with cut off and sanding wheels
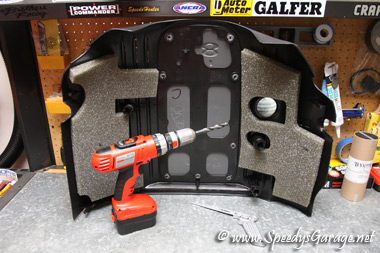
Drill with 1/2" drill bit
Good straight edge
Sharpie
80, 220, and 400 grit sand paper
Sanding block
Expanded aluminum mesh (screen door guard from Lowes)
JB Weld Epoxy
Wire snips
Heavy duty scissors
Tape measure
2 Quick clamps
Difficulty Rating: 


For those that do not want to modify the cover, simply skip down to the painting portion of the article.
Modifying the Engine Cover:
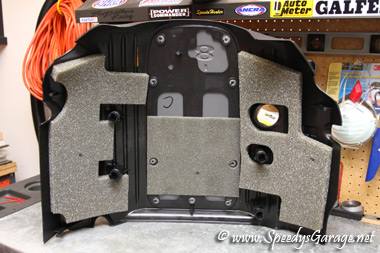
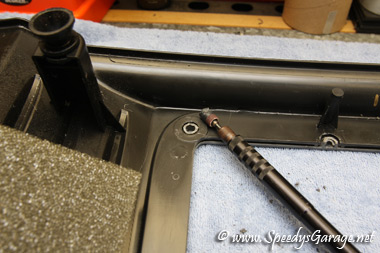
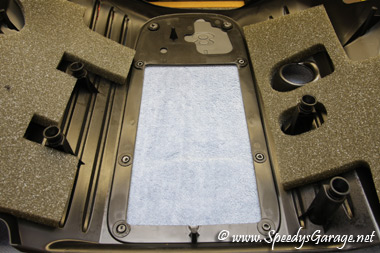
To modify the engine cover, begin by removing the cover from the car. It just pops off by lifting straight up. Next, remove the foam padding from the back side middle area. Now drill four 1/2" holes at the corners where the black cut out areas are. Use the keyhole saw to connect the dots. Try to leave about 1/8” of gray plastic beyond the black edge as viewed from the back and make the cuts as straight as possible.
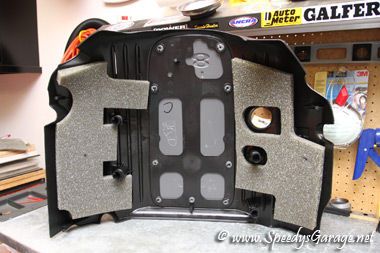
Next decide how far down you want the opening to come. I decided I wanted the “5.7L V8” lettering centered, so I took measurements and cut another inch or so off of the gray area toward the “5.7L V8” lettering. Using a dremel with a cut off wheel on the black portion of the cover may prove useful here. Just be careful as the gray plastic is MUCH softer than the black.

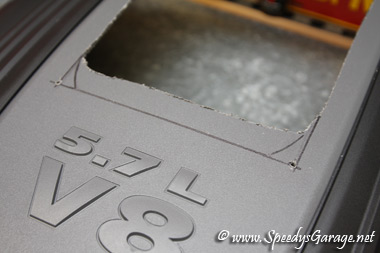
Once you’ve finished cutting, use a dremel with sanding wheel, as well as a sanding block and 80 grit sand paper, to straighten out the edges. Once you’ve gotten the edges perfectly straight, switch to 220 grit to smooth them out, and finally 400 grit. ALWAYS USE THE BLOCK or you’ll end up with dimples in the edge from your fingers. You’ll notice as you sand that a small build up plastic will occur right at the edges. Once all you’re sanding is complete, a quick scuff of 400 grit at a 45 degree angle to the edge will knock this off.
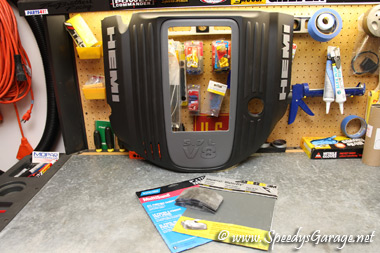
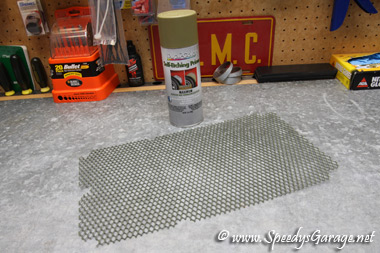
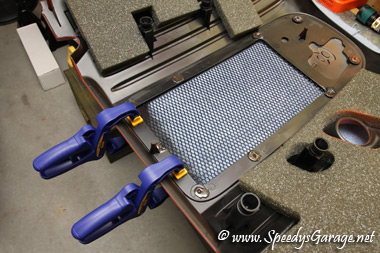
Measure the gray area from the top side of the engine cover. Take note of how large it is and cut the expanded aluminum (aka screen door guard) to match. After searching all over for some expanded aluminum with 1/4" openings, I finally stumbled on to a screen door guard at Lowes that was perfect. They’re located in the hardware section close to the door handles and hinges. Mark out the size you need with a Sharpie, and using snips or heavy duty scissors cut it out.
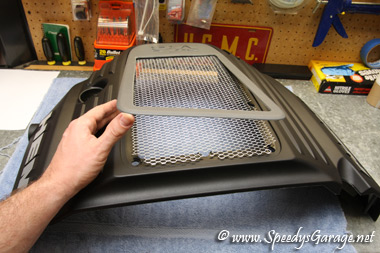
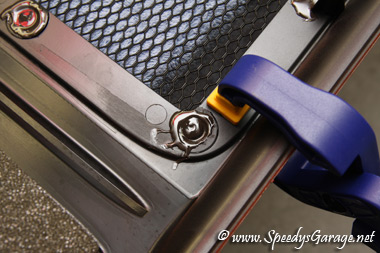
Using a dremel and sanding wheel sand off the tops of six of the melted gray connections that hold the gray part of the engine cover to the black. DO NOT REMOVE THE TWO FRONT MOST CONNECTIONS. Only remove enough material to allow the gray portion to lean up away from the black. This is to allow you to insert the expanded aluminum between the two pieces for a factory appearance. Gluing the mesh to the back would have been easier, but the depth from the top of the gray portion to the mesh was too great and didn’t look very good and it would hit the hoses and wiring on top of the engine’s intake.
Now lay the expanded aluminum on the back of the engine cover and mark with a Sharpie where the gray posts are. Using small snips, remove just enough material to allow those posts to pass through the holes. Start test fitting the expanded aluminum in between the gray and the black part of the engine cover. Make sure none of the expanded aluminum is visible from underneath the gray when viewing the engine cover from the top and do your best to line up the holes in the expanded aluminum so they are symmetrical all the way around. In other words, try to get the expanded aluminum centered in the opening.
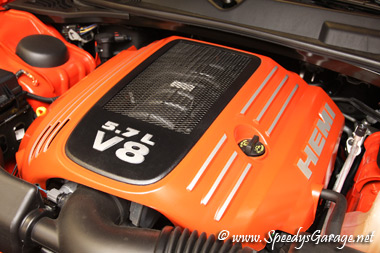
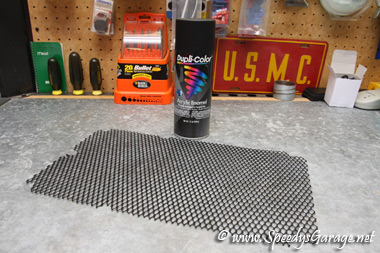
Once the expanded aluminum is trimmed to fit, scuff it with a piece of 3M Red Scuffing Pad, wipe it down with Prep-All, and prime it with the Duplicolor Etching Primer DAP 1690. Normal primer WILL NOT stick to aluminum. Simply follow the directions on the primer can and top coat with Duplicolor Semi Gloss Black Acrylic Enamel DA1603. Follow all paint can instructions for best results. As a tip, two light coats followed by one medium coat works well. Set the painted expanded aluminum aside to dry.

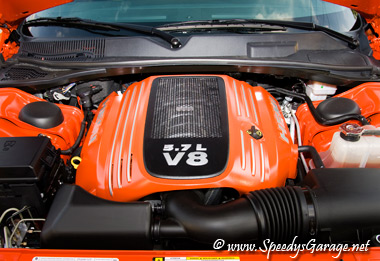
Painting the Engine Cover:
Scuff the engine cover with a 3M Red Scuff Pad. Be careful as the gray portion is much softer than the black and will not require as much pressure. Also be careful around the HEMI lettering so as not to remove the silver color. Once it’s lightly scuffed, wipe it down with a lint free cloth and some Pre-All. Once wiped down try not to touch the portion you’re painting to avoid getting oils from your hands on it. I recommend wiping it down three times. If you have access to compressed air, blowing it off really well will help as well. The point here is to remove all the cutting and sanding debris as well as any oil and dirt.
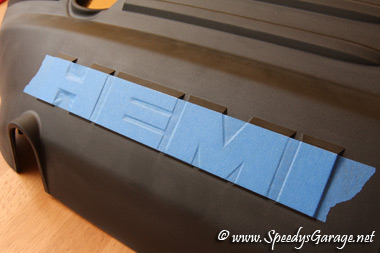
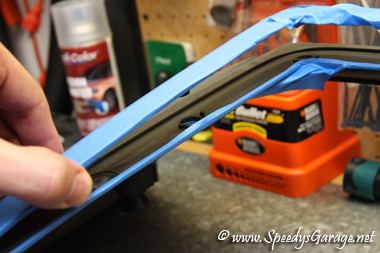
Tape off the HEMI lettering with 1.5” painter’s tape. What you’ll find is that the 1.5” will just exactly fit the letters. Once the tape is applied, press down around the letters so that they become embossed. This will show you where to cut. Using a good straight edge to help, use an X-acto knife to gently score the tape around the lettering until it can be removed. Be very careful on this step. The better job you do taping and cutting the better your end result will be.

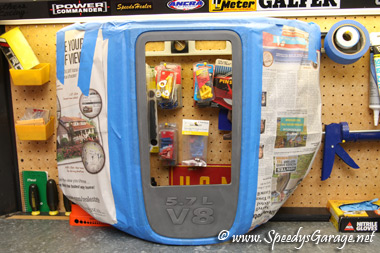
Once the lettering is taped off, cover the black areas of the cover with painter’s tape and news paper. Also cover the foam areas on the back. You want to leave the gray portion exposed as well as the black edge behind it.
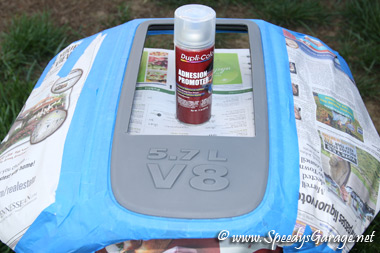
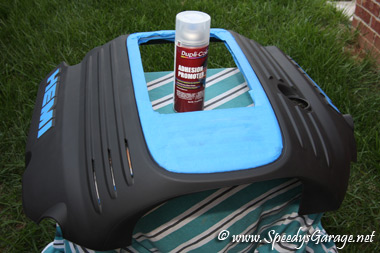
Wipe the gray area down again with Prep-All and apply three light coats of Duplicolor Adhesion Promoter CP199 to the gray area following the can’s instructions precisely. Topcoat with Duplicolor Semi Gloss Black Acrylic Enamel DA1603, again following the can’s instructions. Note, the cans instruct to topcoat within 10 minutes of using the Adhesion Promoter, allow 10 minutes between coats, and all coats have to be applied within one hour. If you forget and wait longer than one hour between coats the can says you can’t apply another coat for SEVEN DAYS. Again, two light coats with one medium wet coat provides the best results. Set the cover aside and let it dry about 4 hours.
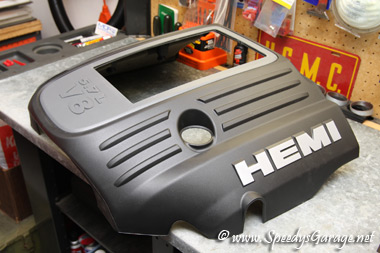
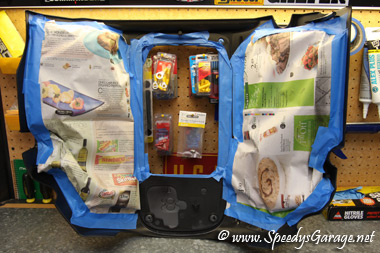
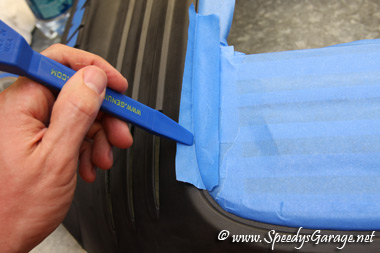
After the paint on the center section has dried 4 hours, remove the news paper from the cover. Now you want to tape off the gray area in order to paint the black area. The curves around the edges and along the front are a little tricky, but you want them perfect, especially in the front. Use a spoon or some other dull plastic tool to emboss the edge and use your X-acto knife to cut very close to the edge WITHOUT cutting the edge itself. It takes patience, but is definitely doable. I have a Hotrod Hardware Gentle Pry Set that works wonders on just about everything, and is what I used to emboss around the edges. Also be sure to tape off the back side edge as you want it to be black to match the center, not orange like the rest of the cover. Tape off the foam areas as well.
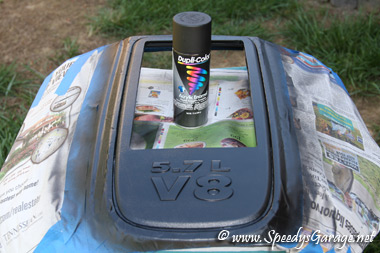
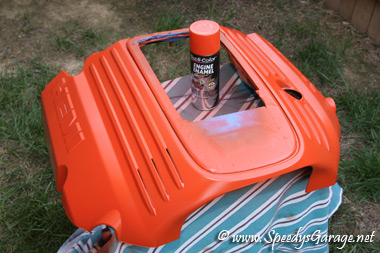
Wipe the black portion of the cover down two or three times with Prep-All. Use the Duplicolor Adhesion Promoter C199 on the cover just as you did with the gray center portion. Three light coats following the can’s instructions. Topcoat with the Duplicolor Hemi Orange Engine Enamel DE1652. For the top coat, work very cautiously. This is what everyone’s going to see, so work in light even coats and build up the finish. Don’t try to cover the black in one or two coats, it’s a gradual process. As you get it covered, follow up with the last coat in a nice medium wet fashion. Let this dry about 30 minutes then CAREFULLY remove the tape over the HEMI lettering. The paint on the engine cover will still be somewhat tacky, so don’t touch it. Using the tip of your X-acto knife gently start one corner of the tape, and pull with a nice steady movement toward the center of the letter. You want to pull in the direction the paint would stick on the edge. If it starts to pull up some of the orange, use the X-acto knife to cut the paint and gently press it back down.
Now apply your pin stripe. Again be careful as the paint is still somewhat tacky. Lay the stripe down on the flutes starting at one end, and apply some tension to the stripe material. You want to kind of pull it as you press it down making sure it follows the edge of the flute. Once laid down, use your X-acto knife to cut it at each end following the contour of the flute. Use VERY light pressure with the X-acto knife. You only want to cut the pin stripe, not the orange paint underneath. As a tip, peel back about one inch of the pin stripe and fold the backing at a 90 degree angle. This will give you some working room to get started. Once you have the front edge placed, pull the backing away.
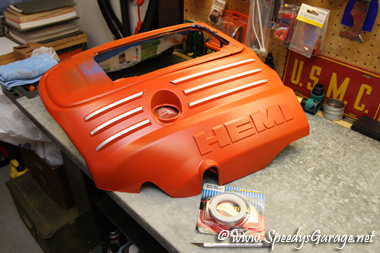
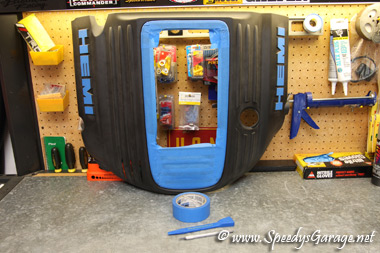
Now you’re ready for the Duplicolor Clear Acrylic Enamel DA1692. You’re going to leave the center section taped off for this as you only want the clear on the orange areas. You will clear over the pin stripe as well as the HEMI letters. Follow the can’s instructions precisely. Lay down two light coats to get started, then some medium wet coats until you have the gloss you desire, or you run out of clear. I used an entire can and did 2 light coats and 3 medium wet coats. Make sure all coats are 10 minutes apart. Once all the clear coats are laid down, set the cover aside and DO NOT touch it. You’ll be very tempted but leave it alone. Let the cover dry overnight then remove the tape from the center section and foam areas on the back. Now you’ve completed painting the cover. If you didn’t modify your cover to open it up you’re finished. Reinstall the cover on the car.

However, if you took my advice and opened up the cover to let some of the heat out, then now’s the time to install the expanded aluminum. I tested three different epoxies trying to find one that would work on the gray section of the engine cover. That portion is made of some special plastic and it’s very hard to find anything that will stick. Plastic Epoxy did NOT work. JB Weld did NOT work. However, since the posts come through the back of the cover which is the harder ABS plastic, we can recreate the manner in which the gray portion was attached from the factory using JB Weld. If you happen to find something that works better please let me know.
Lay your expanded aluminum between the gray and black portions of the engine cover. Mix up a good amount of JB Weld (I used JB Quick as it sets faster and is plenty strong for this). Now using a popsicle stock, smear a little of the JB Weld on the expanded aluminum on the area that will be covered by the gray portion. It won’t take much, just a dab in the middle of the sides and back. Now lay the gray portion down on top of it and use some quick clamps on the end to hold it in place. Now use large globs of JB Weld on each of the six posts from the back side. Make sure to dab each one a few times to get rid of any air bubbles. The idea here is to recreate that mushroom like top that was there from the factory. Once the JB Weld is applied leave the cover lying upside down with the clamps in place and let it dry about an hour.
After the JB Weld dries, set the cover right side up in an area where you’ll be comfortable working on the “5.7L V8” portion. Use your high quality, natural bristle, 1/4", artist’s brush to paint those letters with the Testors Silver Enamel 1146. I tried several times to tape off those letters to spray them, but getting around all the curves and intricacies just wasn’t going to happen. If you have a steady hand it’s not too bad to use a brush. The hardest part is getting down the edges to make the letters pop in 3-D.
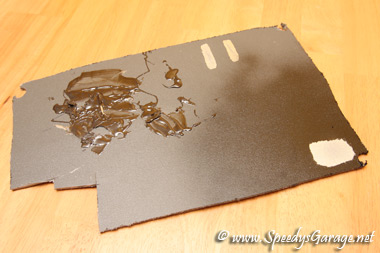
Once that’s painted, you’re finally done. I’ll throw in a couple more tips…one is to always keep the engine cover on some kind of towel even before it's painted. This will help keep it from getting scratched. The other is to save the portion of the center gray area that you cut out initially. It makes a great epoxy mixing tray as well as a platform to test paint and epoxy to see what will stick.
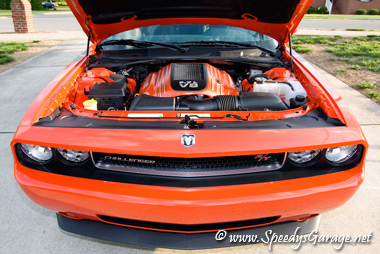
Now when you pop your hood at the car show, or when someone on the street asks to see the engine, there’ll be something there for people to really gawk at. Although this is a lot of work, it really is worth it in the end as it livens up that drab engine cover and makes the engine bay a work of art….literally.