 |
 |
Honda CBR 1000RR Tire Change
Updated May 2008
Since there are so many questions asked about how many miles you got from XXX tire, I'm going to keep a log here for the tires I've used and the mileage I experienced.
| Tire | Front Miles | Rear Miles | Notes |
| Pirelli Corsa | 5,908 | 5,908 | OK tire - no track days |
| Michelin Pilot Power | 5,887 | 3,660 | GREAT tire - no track days - more aggressive riding |
| Michelin Pilot Power 2CT | in use | not mounted yet | one track day on front |
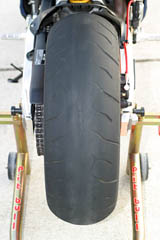
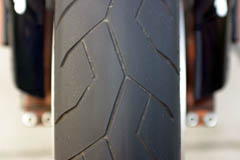
The Pirelli Corsa tires that came stock on my 1000RR did a great job for me and lasted 5,908 street miles. I was quite surprised the rear tire lasted that long, however I did run it about 500 miles past where I'd recommend with cord showing in the center by the time I changed it out. I normally wouldn't run a tire to that point or wear, but I was curious how far it could go. The front was down to the side wear bars as well. I'm very anal about tire pressures, making sure I used 36 front and 42 rear for commuting and 32 front and 34 rear for spirited riding with these stock Pirelli Corsas. This attention to tire pressure may attribute to the higher mileage I got from the rear tire, however I'm surprised the front needed replacing at this point. After reading rave reviews on the Michelin Pilot Powers I decided to give them a try. I stuck with the stock tire sizes of 120/70 front and 190/50 rear.
|
|
|
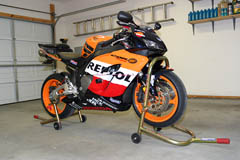
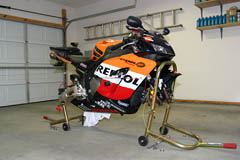
You have some options when changing tires as far as labor goes. You can just drop the bike at the dealer with the new tires and just pick it up when they're mounted, or you can remove the wheels from the bike yourself and just have the dealer change out the actual tires. Removing the wheels from the bike saved me a considerable amount of money over having the dealer do it, so I went that route as it's actually pretty easy to do. These are race ready bikes after all right? You'll need a front and rear stand that will get the wheels off the ground if you're going to remove the wheels yourself.
Once you have the bike supported on the stands, start at the front and remove the 14mm brake caliper mounting bolts at each caliper and tie the calipers to the forks using some wire so that there is no stress on the brake lines. Next loosen the 12mm right axle holder pinch bolts and remove the 22mm front axle bolt. Next loosen the 12mm left axle holder pinch bolts and remove the front axle. You may need to use a wooden dowel or other soft object to tap the axle out of the wheel. Then just roll the front wheel out and remove the side collars. At this stage the front wheel is ready to be hauled to your favorite tire mounting location.
 |
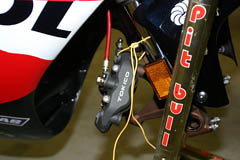 |
Removing the rear wheel is fairly easy, especially if you have a second set of hands to help out. Start by loosening the 12mm lock nuts and drive chain adjusting bolts on each side of the swing arm. Remove the 32mm axle nut, washer, and drive chain adjusting plate. Push the rear wheel all the way forward giving as much slack in the chain as possible. Derail the drive chain from the sprocket and remove the rear axle by pulling it out the left side. I laid a cotton towel over my left lower fairing to protect it from getting scratched by the chain. The rear brake caliper sets in a slot and is supported by the rear axle. The caliper is not bolted to the bike so be careful that it does not fall from its bracket and scratch up your wheel when you pull the rear axle out. Once the axle is out, you can maneuver the rear wheel out the rear of the swing arm. You'll need to remove the side collars, driven flange, and cush drive before taking the wheel to the tire mounting location. These items just pull off the wheel with ease. When having the new tires balanced you can choose either clip on style weights or stick on. I chose stick on in an effort to protect my wheels from scratches.
Once you have the tires mounted and balanced just put them back on the bike in reverse order. Apply a thin layer of high quality grease to the front axle and install the front axle from the left side. Be sure the side collars are reinstalled and install the axle bolt and tighten to 58 ft/lbs (78 Nm). Next tighten the right axle holder pinch bolts to 16 ft/lbs (22 Nm). Install both brake calipers and tighten the mounting bolts to 33 ft/lbs (45 Nm). I also put a dab of blue Locktite on the caliper mounting bolts. The manual recommends using new caliper mounting bolts, but I re-used my originals as they looked to be in good shape. With the front brake applied, pump the forks up and down to seat the axle and check brake operation. Once everything feels seated and the brakes are pumped up, tighten the left axle holder pinch bolts to 16 ft/lbs (22 Nm). That's it for the front.
Reinstall the cush drive, driven flange, and side collars on the rear wheel. Put a light coat of high quality grease on the rear axle, and remount the rear wheel to the bike, again being careful that the rear caliper doesn't scratch your wheel. Install the chain adjusting plate and washer. Adjust the drive chain slack to between 1 inch to 1 3/8 inch (25mm - 35mm) at the mid point of the chain per the manual and tighten the 12mm lock nuts. Tighten the rear axle nut to 83 ft/lbs (113 Nm) and recheck the drive chain slack.
So far I'm very happy with the Michelin Pilot Power tires. They grip well and feel like they allow the bike to achieve a higher lean angle. A new Pilot Power with a dual compound called a "2CT" is available and in the beloved 190/55 size for the rear. However this tire is only available in Europe and possibly Canada, and I'm told we'll not see this tire in the US anytime soon. Pity as that would be a nice combination on the 1000RR.
I took these tires for a 200 mile high speed jaunt recently and they are very confidence inspiring. The Pirelli Corsas were good, but gave a feeling of drifting when leaned over at high speeds. These Pilot Powers just flat stay put and the bike goes where you point it. I've read the Michelin Pilot Powers work better with slightly lower pressure, so I went with 29 front and 32 rear rather than the 32 front 34 rear I normally used with the Corsas. I will update this page once the new Pilot Powers wear out noting how many miles I was able to get from these tires.
 |
 |
This page is part of a frame set. If you reached this page via a search engine please click here to go to the main page.