|
|
Honda CBR 1000RR Carbon Fiber Vinyl Seat Covers June 2005 When doing my stock dyno runs I decided to open up the baffles in the stock exhaust to see what power could be gained just for kicks. I got a little carried away with the process and inadvertently made a hole in the rear of my stock muffler which I did not realize occurred. When going for a test ride the hot gas from the exhaust caused a small amount of damage to my under tray and driver's seat. The damage was minor, but the stock vinyl was melted toward the rear of the stock seat. This gave me an opportunity to upgrade to carbon fiber vinyl on the seats. To complete this project you'll need a heavy duty stapler with 1/4" (6mm) staples, some new vinyl material that is "marine grade", a flat head screw driver, needle nose pliers, and a hair dryer. I used a Stanley electric stapler but it was a real pain to use and only about 1 in 4 staples went into the seat properly. I would have to pry out the bent or crooked staples and redo them constantly which greatly increased the time to complete this project. I HIGHLY recommend using a pneumatic upholstery stapler for this task to avoid the frustration. Spray adhesive might be helpful, but is optional and I did not use any. If you find the stock seat too hard on the o'l bum, now would also be a good time to add some gel material as well. I've not had problems with the stock seat, and the gel material is pricey at about $80 US for a 12"x12" square, so I decided to just replace the vinyl and leave the foam as is. Putting gel in wouldn't be too difficult. You'd just need to trim out some of the stock foam material to fit the gel into the contour of the seat.
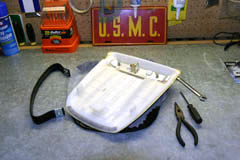
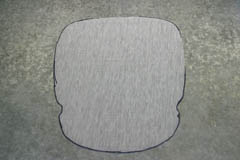
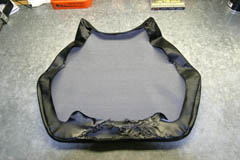
I began with the rear seat. Remove the 10mm bolts on the bottom side of the seat, then remove the hand strap and bracket. Using a small flat heat screw driver and needle nose pliers, pull the staples out of the bottom of the seat and remove the stock vinyl. Then use a hair dryer to heat the stock vinyl and work with it until it lays flat. Let the stock vinyl set over night to become as flat as possible. Lay the stock rear seat vinyl on your new vinyl and trace it to make a pattern for your custom seat. Once you have the pattern traced, simply cut it out. It's best to trace on the back side of your new vinyl so that the trace marks are hidden after it's installed.
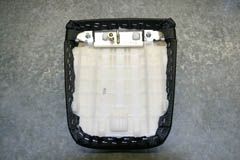
Once you have the new vinyl cut out, lay the rear seat down on the vinyl and start to shape the vinyl to the seat to make sure your pattern and cutting are correct. You'll need about 3/4" to 1" of vinyl to overlap the seat to give you room to staple. Once you're sure it will fit, begin stapling the vinyl in place. Put one staple in the top and one in the bottom to hold the vinyl in place, then work your way around the edges pulling the vinyl snug to the seat and use a hair dryer to heat up the vinyl to make it stretch into place to help it contour to the shape of the seat. Once you have the new vinyl stapled in place, put the bracket back on the seat. The hand strap is optional and I left mine off. If you decide to leave the strap off, you'll need to use a couple of small washers to act as spacers under the rear seat bracket hooks. Make sure to use wide enough washers to give the hooks a solid base.
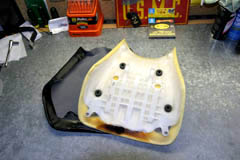
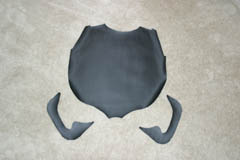
The front seat requires a little sewing in order to fit properly. I've heard of people just wrapping the vinyl around the seat, but with the shape of the foam, I don't think the seat will look like it fits the bike properly using that method, so I advise having it sewn just as the stock seat is. Again, use a small flat head screw driver and needle nose pliers to remove the staples in the stock vinyl. Once removed, use a sharp knife to cut the thread holding the stock vinyl together. Then use a hair dryer to heat the stock vinyl to make it lie flat. You might want to let it set overnight or heat it several times to get it as flat as possible. Then use the three pieces from the stock driver's seat to trace out a pattern for each of the three pieces in your new vinyl. Cut these pieces out paying attention to the little jagged edges on the side pieces. Once you have the three pieces cut out, sew them together in the same fashion the stock seat was sewn. My Dad sewed mine together for me and it came out great. Once it's sewn, just slip it over the seat and staple in place. Remember to leave a little room around the rear mounting holes so the vinyl can be lifted up to allow you to get to the screws. One thing to be aware of is that the carbon fiber vinyl is directional, so be sure to match up the direction for the driver's and passenger's seats. You can see the burn mark the exhaust left on my stock driver's seat. That is the reason I upgraded the vinyl.
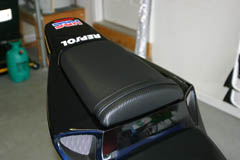
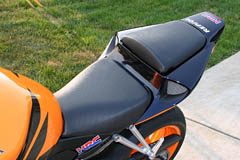
Mounted to the bike the seats look great and go along well with the other carbon fiber details such as the Honda wings on the tank cover on my Repsol model. The only down side that I've found to this material is that it's not as slippery as the stock vinyl, so you don't slide around in the seat as easily. That's not really a huge issue for me but if you see a lot of track time or race, you may want to find a vinyl that is more smooth. As I said, I left my passenger seat strap off the bike as it's really not good for anything, but I took a picture with it on the bike so you can see the difference. |