"How To" DVD available for this modification
Honda CBR 1000RR Power Commander III USB
"How To" DVD available for this modification
June 2005
I've owned several sport style motorcycles as well as cruisers going back to the carbureted days. I never re-jetted any of my carbureted bikes, nor had I ever owned a Power Commander. I decided I would try one out on the 1000RR to see if Power Commanders were hype or legitimate. I can say that installing a Power Commander on this bike has been the single most noticeable modification I've made.
After installing my PC3USB it was pretty late. I installed a Jardine Titanium Slip On at the same time and wanted to go for a quick test ride to make sure there were no exhaust leaks and to make sure the bike was running normally with the PC3 installed. Right off the bat I noticed the bike was running much better. The on/off throttle was MUCH smoother and gear shifting was like butter. The crazy thing was I hadn't even installed a map in it yet and I assumed the PC3 was set to zero, meaning it wasn't affecting the bike. I thought the noticeable difference was all in my head, and I was just looking to feel a difference since I had just installed the parts. I went to bed and figured I would just hook up the laptop to the PC3 the next morning to see what map, if any, was loaded.
The next morning I hooked up the laptop and found the PC3 had been loaded with Power Commander's Erion Slip On and Stock or Aftermarket Air Filter Map (M121-002). The retailer I purchased the Jardine and PC3 from loaded this map based on the items I purchased from him. There is no Jardine map, so this Erion Map was the closest to my bike's configuration. I loaded the "zero" map which means the PC3 is making no air or fuel modifications and for all intents and purposes is not affecting the bike at all. I took the bike for a test ride and instantly noticed the difference. The on/off throttle was much more jerky and gear shifts were no where near as smooth. I did not notice how jerky the bike was before installing the PC3, but now that I've felt how smooth it CAN be, it's quite obvious. I would HIGHLY recommend a Power Commander be the first modification made to a bike, even a completely stock one.
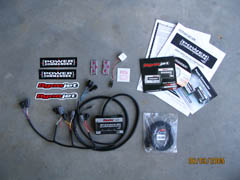
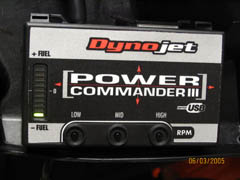
The Power Commander III USB comes with the Power Commander Unit, two plugs for the communication ports, a CD with software and manuals, and plenty of decals. An alcohol swab and adhesive Velcro pads are also included if you want to use those items to secure the PC3 unit in the tail of the bike. A 9V battery adapter is also included if you want to load maps to the PC3 prior to installing it on the motorcycle. On a 1000RR the PC3 gets power when the ignition switch is in the "on" position.
|
|
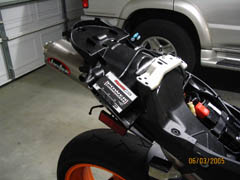
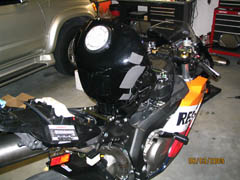
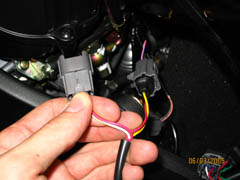
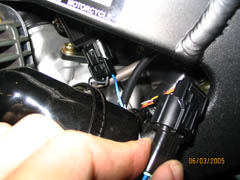
Installing a PC3 is simple. The instructions are easy to follow and well written, so I'll just give a quick run down. Begin by removing the seats, tail section, tank cover, and left mid fairing. Then place the PC3 in the tail section where you want it to live and route the wires toward the front of the bike. Be sure to leave enough slack in the wiring harness in the tail section so that you have enough slack to remove the PC3 in order to attach a laptop for programming. Remove the rider's seat bracket to route the wiring harness underneath. Unhook the gas tank drain tube and rock the tank back and secure it with a piece of wood or other suitable object. Next, unhook the rubber skirting around the fuel injectors. Beginning from left to right, unplug the fuel injector connections and hook up the PC3 connectors. !!!BE SURE TO USE THE LOWER INJECTORS!!!
Finally, connect the TPS (throttle positioning sensor) to the PC3. The TPS sensor is located just behind the ribbed module and wiring pack on the left side of the bike. Zip tie the wiring where appropriate and tuck everything away as neatly as possible making sure no wires are pinched or crimped. Hook the black wire coming from the PC3 harness to the negative ( - ) side of the battery. Turn on the ignition to make sure you see the LEDs on the PC3 go through their animation sequence and the bottom LED should remain illuminated. Once you've verified the PC3 is operational, button the bike back up. You may want to Velcro the PC3 in place in the tail section to keep it secure.
|
|
|
|
|
|
|
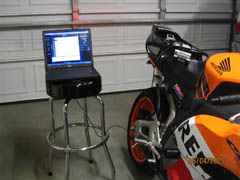
At this point you'll need to install the Power Commander software on a laptop or other suitable computer system. This is pretty self explanatory, so just follow the instructions that come with the Power Commander. You'll also want to load the proper maps for your bike onto the same computer. The Power Commander software can also do this automatically as it's very intuitive. I recommend visiting www.powercommander.com to make sure you have the latest version of their software and map database.
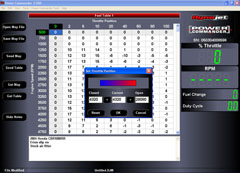
Once you have the above steps completed, connect the computer to the PC3 using the supplied USB cable. Turn the bike's ignition to the on position and the map currently in your PC3 will be displayed automatically. The first thing I recommend is to "calibrate" your throttle position. When I first plugged my laptop into the Power Commander zero throttle showed 1% in the software and at 100% throttle I showed 102%. Ideally you want to see 0% and 100% respectively. Calibrating the throttle is simple, just select "Power Commander Tools" in the top of the window, then select "Set Throttle Position". This will open a small window allowing you to calibrate the software to match your bike's throttle position. Select "reset" and set the value of your throttle completely closed, as well as wide open. On the CBR1000RR this can be done without the bike running, just switch the ignition to the "on" position. If you have questions about this procedure, www.powercommander.com as well as the instruction manuals on the CD detail this procedure.
|
|
|
|
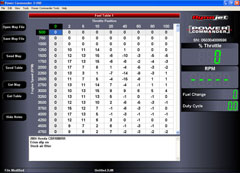
Once you've got the throttle position calibrated you can load the proper map to suit your bike's modifications and go for a ride. Loading maps is a simple and painless procedure, again I refer you to Power Commander's documentation for how to accomplish this. You'll instantly feel the difference in power delivery and smoothness with the proper map loaded for your bike. I thought this bike was strong prior to installing a PC3. Now it's down right spooky. It was literally like learning to ride a new machine. I can't emphasize enough the benefit to one of these devices. Even for a stock bike, this would be the FIRST modification I'd make and all my future bikes will have one. Be sure to look over the documentation for the unit and software as there are many features, especially in the software, that are very handy such as the "map compare" function.
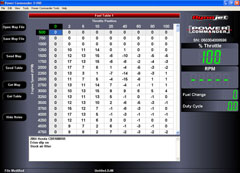
The way the PC3 works is pretty simple, yet effective. The air and fuel ratio is broken down into a grid consisting of 250 RPM increments and throttle position percentages within the PC3. At each 250 RPM increment and 0,2,5,10,20,40,60,80, and 100 percent throttle positions you can set a value to either add fuel (richen the mixture) or take fuel away (lean the mixture). This in turn allows you to custom program the fuel injection system on the bike to run at optimum efficiency. The stock ECU is designed to meet EPA requirements and runs very lean in the lower RPM ranges and then becomes rich in the upper RPM ranges. Getting the proper amount of fuel and air to the combustion process at the proper throttle position and RPM is paramount to performance.
One final note: The PC3 comes with two plastic plugs, one for the USB port and the other for the larger expansion port. MAKE SURE to install the plastic plugs securely. Getting water or debris in these ports will likely kill your Power Commander III USB.

This page is part of a frame set. If you reached this page via a search engine please click here to go to the main page.