|
Honda CBR
1000RR SpeedoHealer Install
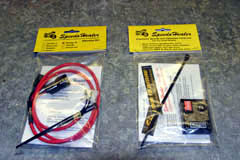
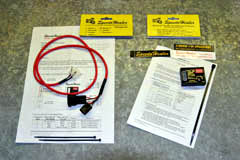
To correct the stock Honda speedometer error and in preparation for my planned gear changes I installed a device called a SpeedoHealer. This handy item has circuitry that is sealed in a weather proof box about the size of a Zippo lighter. This internal circuitry can be calibrated to completely adjust out any inherent speedometer error on your bike. This is especially useful if you change tire sizes and or gearing as the factory speedometer error is increased when those types of changes are made which can rack up the miles on the bike due to the inaccuracy of the speedometer. As of this writing the latest version of the SpeedoHealer is v3.0 which has an extended calibration range (-99.9% - +99.9%). One feature useful for any speed junkies out there allows you to set the calibration to -90.0% meaning it bypasses the top speed limiter on bikes that have a speed sensor triggered limiter. With this -90.0% setting 190MPH would show as 19MPH on the speedo. The SpeedoHealer will also recall the last top speed the bike achieved and display it on your speedometer. You can read more on this little gadget at www.SpeedoHealer.com. The device is a two part unit. The control box which weighs 0.10 lbs and the wiring harness which weighs 0.13 pounds for the 1000RR making the total weight of the unit 0.23 lbs. The unit comes with a couple of zip ties for the wiring, but plan on getting some extra ones. It also comes with nice color instructions and a couple of decals, one of which ironically states "I know I'm speeding, my speedometer is calibrated!"
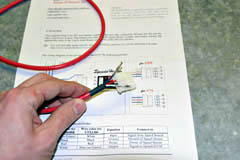
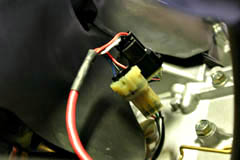
The Honda II wiring harness works for the Honda CBR1000RR as well as the Honda VTX. SpeedoHealer left two wires disconnected from the wiring harness molex connector so the first thing you'll need to do is plug those into the correct ports on the molex plug. As the nice color instructions show, connect the white connector to the port next to the red wire, and the blue connector to the port next to the black wire.
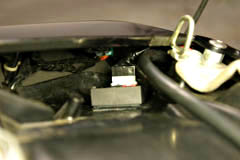
Next you'll need to remove the seat, tank cover, and lift the gas tank and support it. The CBR1000RR speed sensor is located nearly in the center of the bike just on top of the engine block. Unplug this sensor and plug one end of the SpeedoHealer to the male end, and the other end of the SpeedoHealer to the female end. Removing the plug from the metal bracket makes it easier to work with, just be sure to put it back on the bracket once you've got everything connected and push the wires down as flat as possible so they take up the least amount of room. This connection puts the SpeedoHealer in line with the speed sensor so that the signal can be modified by the unit before it reaches the speedometer/odometer.
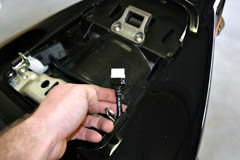
Now just run the molex plug and wire to some location on the bike where it'll be away from heat and as protected as possible. I ran mine along the PCIIIUSB wiring and under the tail section to the trunk. I mounted the unit in the truck with a piece of Velcro to keep it secure and vibration free.
Once the unit is installed you'll need to test it. The instructions give you a very precise test for the input as well as the output of the SpeedoHealer. Set the first dip switch to "on". Turn the ignition to the "ON" position and you should see a single red flash of the LED on the unit. The speedometer will also display a constant value, in the case of my 1000RR it was 12MPH. I believe this value is set for all 1000RRs as it's bike specific. Finally, spin the rear tire by hand with the bike in neutral and the ignition on. You should see the LED flash. If these two tests are successful, then you're SpeedoHealer is installed properly and you can button up the bike. Finally, you'll want to calibrate the SpeedoHealer to your bike. This is the most important part of the process as without calibration the SpeedoHealer will not send the proper correction value to the speedometer. There is an online calculator and equations at www.speedohealer.com to assist with the calibration. The best and most accurate way to calibrate the unit is with a GPS. Simply drive at a constant speed and check the speed on the GPS and compare it with the speed the speedometer registers. The online SpeedoHealer calculator will give you a correction factor based on the difference between the two values. Obviously you'll want to do the GPS method in a safe controlled environment.
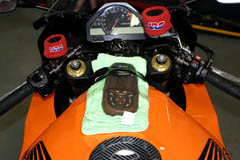
I taped a GPS to my tank and went to a pretty isolated section of highway and did several speed tests so that I could make a correlation between the error at each speed. This also allowed me to get an average error which would be the most accurate to program into my SpeedoHealer. I took readings at 30MPH, 50MPH, 60MPH, and 100MPH. The following table shows the indicated speed (on the speedometer) vs. the GPS actual speed as well as the % error.
I used +7.2% for my correction factor which correlates to a -6.7 programmed into my SpeedoHealer according to their online calculator. I then re-checked my speedometer with the GPS and found it 100% accurate to the nearest MPH. This is a pretty handy device if you want your speedometer to be accurate. With an error of +7.23% and 5900 miles on my bike, it's registering nearly 430 more miles on the odo than I've actually ridden. Now that's no longer a problem.
This page is part of a frame set. If you reached this page via a search engine please click here to go to the main page. |