|
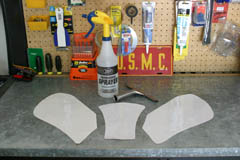
Honda CBR 1000RR Tank Slapper Tank Protector August 2005 I wanted to get a little protection on my tank to avoid scratches and dull spots from my riding gear rubbing. I began looking into various products from carbon fiber over lays to the stick on type tank protectors that are common today. The carbon fiber overlay was a little bit overboard on the carbon fiber for me, and the stick on type I see on other people's motorcycles tend to either peel or leave a nasty gooey edge over time. I was turned onto a product called The Tank Slapper by a fellow board member at the 1000RR.net message board and decided to give it a try. It was cheap, much cheaper in fact than the stick on type, so if it didn't work out it wasn't too much of a loss. The product is a non adhesive 3M film that is pre cut to fit the tank. It is three pieces, two for the sides and one for the area just in front of the pilot seat. To install it you need a spray bottle with a fine mist, a squeegee or spatula, a bucket of water, and possibly a hair dryer.
Installation is somewhat challenging. You need to clean and wax the tank prior to installation. I also suggest doing this on a warm day when the humidity is rather high. If you live in a dry area you'll definitely make use of the bucket of water. I live in TN and the day I did the install the humidity was around 50% with an 85 degree F (29 C) temp. I still had to work hard to get it to lay properly. After you get the tank clean and waxed making sure all lint or any other foreign objects are removed, spray the tank down with plenty of water from the spray bottle. Peel one of the side pieces off its backing and lay it on the tank making sure you have it oriented correctly and move it into place. Using a squeegee, I found a Pampered Chef spatula worked better, squeegee the water out starting from the center of the piece and working toward the edges. The object is to remove any and all air bubbles leaving the Tank Slapper invisibly installed. This proves to be easier said than done. I tried two or three times before getting it right and found that I actually had to dunk the piece I was working with into the bucket of water, as well as spray the tank with water. Repeat the same process for the other pieces. I found it easiest to do the sides first then the center as it gave me a reference point to line everything up. You may need to use a hair dryer to heat the Tank Slapper material to make it form to the shape of the tank. I had problems on the side pieces where the tank's concave area is as well as along the rear of the middle section where it curves to reach the top of the tank.
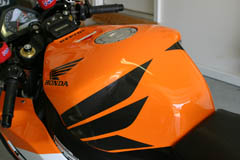
I've had this product on my bike for about 800 miles and have had no problems. You can remove the Tank Slapper and re-apply it if necessary as it uses no adhesives. Once installed and all the air bubbles removed it's virtually invisible, as you can see in the picture of it installed below. It does a good job of protecting the tank areas for normal street riding, but for race use you'll need to find a more durable product as I'd imagine the Tank Slapper material would tear with heavy race use.
|