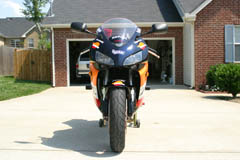
Honda CBR 1000RR Vortex Frame Sliders
July 2005
After reading several reports of people with 1000RRs going down on the left with the Shogun No Cut Frame Sliders and cracking the water elbow behind the slider, I decided I'd upgrade to the cut type sliders. I'd rather have a hole in my fairing for the slider rather than have to drop the motor to replace a water elbow. My thinking is that there is going to be some type of damage to the plastic if the incident is even at a slow speed with either type of slider, cut or no cut. I'd rather just replace plastic rather than replace plastic and spend hours dropping and reinstalling the motor due to the cracked water elbow. I chose the Vortex brand of slider as it is a two part design allowing you to replace the slider puck independent of the rest of the slider making it cheaper than having to replace an entire set of sliders should one of the units need to do it's job. I had Vortex sliders on my 2003 Honda 954RR and although I never had to test them, I was very happy with the quality and design. The 954RR didn't require fairing modifications to install them, however. The Vortex sliders are relatively light weight at 1.34 lbs (0.61 Kg) and have a large aluminum base that the puck attaches to. The pucks are side specific so be sure to pay attention to the brief instruction sheet explaining which puck goes on each side of the bike. The longer bolt is used on the right side of the bike.
I originally thought I'd use a 1.75" (44.45 mm) hole saw with a pilot bit to make the necessary holes in the lower fairings. My thought was to use some white paint on the mounting bolt to make a mark on the inner fairing so I'd know where to drill. I decided to get the opinion of Matt McCord who's my friendly neighborhood bike salesman as well as a good friend that has a lot of experience with cut type sliders among other things bike related. He suggested an alternative method. Matt happened to be installing a set of sliders for a client and invited me to his shop to watch his installation method. After watching him perform this task, I decided his method would provide a cleaner installation.
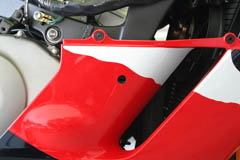
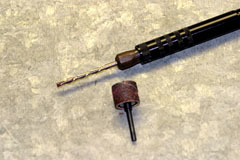
Begin by removing the upper fairing on the 1000RR. This will allow you to see the lower front engine mounting bolt where the Vortex slider will mount. Using a 1/4" drill bit, drill a hole through the lower fairing while it's still mounted to the bike at the location of this lower front engine bolt. Try to get this 1/4" hole as close to the center of the engine bolt as possible. Next use a dremel tool with a cutting bit and slowly enlarge the hole. Be sure to brace your hands well and use a medium speed so as not to lose control of the tool and make too large of a cut. Also be sure not to go too deep with the cutting bit or you'll gouge the engine covers or cut the radiator hose on the left side. You only need to insert the cutting bit about 1/4" as the plastic is very thin. Remove small pieces of the foam on the back of the fairings as needed. Once the hole is large enough to allow the Vortex installation bolt to pass through, remove the stock lower front engine bolt. Reinstall the upper 1000RR fairing and tighten all bolts and mounting tabs as if the bike were put back together. This insures the slider base will make contact with the plastic as it would installed, which is critical for the next step. Use the Vortex installation bolt for the proper side of the bike your working on and put it through the small hole you've made in the lower fairing along with the Vortex aluminum slider base. If you're able to turn the bolt a couple of turns to secure it to the bike, do so. Once you're satisfied that this slider base is somewhat secure trace around it with a pencil to leave a pattern on the fairing. MAKE SURE there is very little play in the puck base so your trace of the Vortex base is accurate. Remove the Vortex base and bolt and begin enlarging the hole using the dremel tool and cutting bit. Once you get close to the pencil mark you made, switch to the sanding wheel for fine precision trimming and enlarge the hole up to your the mark you penciled. I use a pencil attachment on my dremel tool to make it more manageable, but you can probably get by with just a standard dremel tool if you're careful.
|
|
|
|
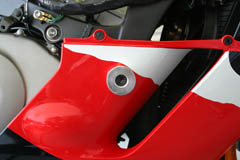
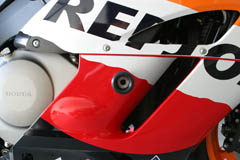
You'll want to remove small amounts of material and then remount the slider base to the bike to make sure your moving in the right direction. Remember the idea is not to have a perfectly round hole, but to have a hole that appears symmetrical around the puck. That's why the hole saw solution usually doesn't work out as well as this method. A hole saw will create a perfectly round hole, but the way the plastic contours and isn't a perfectly flat surface can cause the hole to look off center around the slider once installed. The method recommended here is a little more time consuming, but if your a perfectionist like I am, the results are well worth the effort. After two or three mounts to check my progress I had a nice symmetrical hole that fit the slider perfectly. You'll notice how it doesn't appear to be round, however it has a nearly perfect 2mm gap around the puck once installed. It took me about 45 minutes per side to get each one completely finished.
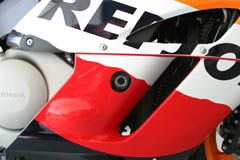
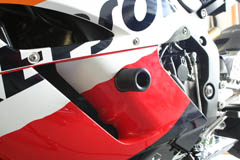
Once the hole is large enough to allow the slider base to easily slide through, blow off all the shavings from the work are, paying special attention to the bolt hole. Next, mount the base and puck to the bike using a 10mm hex socket. You can either have the hole very snug around the puck, or leave a small gap to allow for any flexing the puck may do in the event of an incident. I chose a 2mm gap as that looked the best to me, and would give the puck a small amount of flex room should I be unfortunate enough to have an incident. Once the base is securely fastened using stock engine bolt torque specs of 47 ft/lbs (64 NM), attach the slider puck using the Vortex mounting bolt which also uses a 10mm hex socket. Vortex did not list a torque spec for this puck bolt, so I just secured it tight plus a quarter turn. As with the Shogun sliders, I recommend using some anti seize compound on the engine bolts to prevent them from corroding and becoming difficult to remove in the future. The right slider will show more if it's base than the left due to the design of the Honda engine, casings, and plastics.
I feel a lot more comfortable having the cut type sliders in place. I had heard of about five people having to drop their motor to replace that water elbow due to the Shogun No Cut Sliders bending and cracking the elbow even during slow speed low sides. This can not only leave you stranded and having to get a tow due to not having coolant flow for the motor, but dropping the engine and reinstalling it are a real chore due to the difficulty in lining up the mount points. The Shogun Sliders do seem to protect the frame, which is what frame sliders are for, so whether or not the water elbow is an issue for you is a choice you'll have to make when you decide on which sliders to buy.
|
|
|
|
This page is part of a frame set. If you reached this page via a search engine please click here to go to the main page.