ADDCO Sway Bars
I did quite a bit of research on how to improve the handling of Project SportRunner before deciding these ADDCO sway bars were the way to go. I wanted to firm up the 4Runner's handling without changing the ride quality, as the 4Runner is a very comfortable vehicle to drive every day. I was trying to solve the issue of the vehicle feeling top heavy and wallowing through the simplest of curves. I looked into new shocks, stiffer springs, and even a mild lift to solve the problem. I don't off road the 4Runner any more than getting to the occasional secluded camp site, so a lift kit was really over kill for what I needed, and probably wouldn't solve my problem. Stiffer springs, which are a component of a lot of the lift kits I found, would lift the vehicle a couple of inches, but could also make the ride more harsh, which I wanted to avoid. Upgraded shocks were another solution I was considering such as a set of Tokicos, then I found the ADDCO sway bars.
For this modification you'll need:
ADDCO front sway bar P/N 573
ADDCO rear sway bar P/N 483
Energy Suspension graphite impregnated bushing kit P/N 9-5165-G (optional)
Energy Suspension graphite impregnated bushing kit P/N 9-5161-G (optional)
4 Grade 10 bolts (M8 x 1.25 x 30mm) - front sway bar brackets
4 Grade 10 bolts (M8 x 1.25 x 20mm) - rear sway bar brackets
4 Grade 10 nylock lock nuts (M8 x 1.25) - front sway bar brackets
4 Grade 10 flat washers (M8) - front sway bar brackets
8 Grade 10 large outside diameter flat washers (M10) - front and rear sway bar
brackets
8 lock washers (M8) - front and rear sway bar brackets
Grease (I recommend Mobil 1 synthetic)
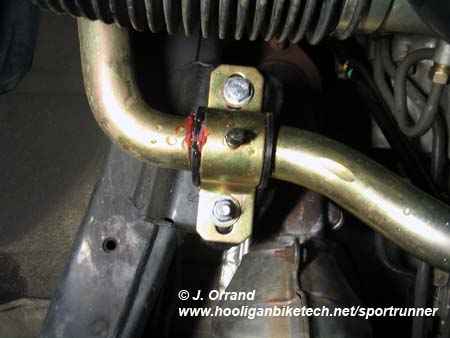
Be aware that metric Grade 10 is equivalent to standard Grade 8. For this you'll want to use Grade 10 metric hardware for strength. Standard washers and lock washers (Grade 8) can be substituted if a close size can be obtained. For the rear sway bar brackets, the M10 washers will be slightly too large on the side closest to the bar. I used a dremel tool to shave that side down a few millimeters so it would fit. This allows the largest diameter washer to be used to spread the load over the bracket mounting point for extra strength.
|
|
|
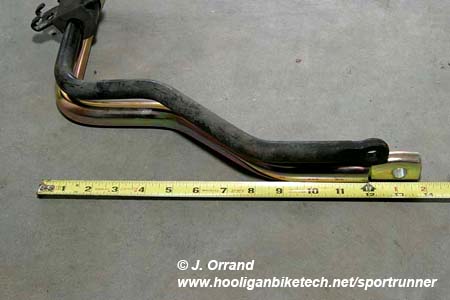
After reading up on these sway bars they were precisely what I was looking for. The ADDCO front sway bar is 1.25" in diameter compared to the stock's 1" diameter. The front also comes with new end links and polyurethane bushings to further enhance the handling characteristics. The ADDCO rear sway bar is 1" in diameter compared to the stock's .75" diameter. The ADDCO rear sway bar reuses the stock end links.
Installation is pretty straight forward. Just park the vehicle on level ground and set aside a few hours to remove the stock bars and replace them with the ADDCOs. MAKE SURE the vehicle sits level or you'll put the sway bars in a bind scenario making them more difficult to remove. I thought the install would be very easy, but holding a 40 pound bar while trying to compress poly bushings to fit bolts is tougher than I thought. I'd recommend having a buddy on hand to help out to make the install MUCH easier.
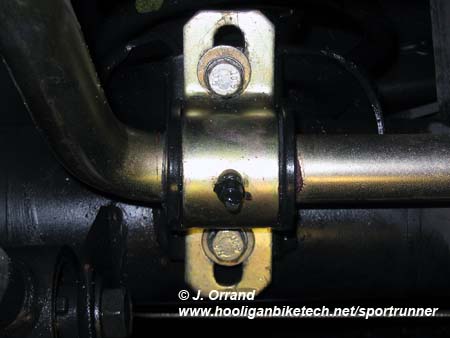
As an additional and cost effective upgrade I'd recommend switching out the ADDCO mounting brackets to Energy Suspension graphite impregnated greasable units. This will allow you to get a grease gun on the bushings periodically to keep them lubed and noise free. Standard polyurethane bushings have a tendency to squeak and greasable units allow for quick greasing rather than having to remove them to manually apply grease. The graphite impregnation also helps with the squeaks. I've found giving them a couple of pumps from the grease gun at every oil change is sufficient. Just be sure to grease the bushing thoroughly as well as the location on the bar where they'll rest prior to installation.
The Energy Suspension bushings can be obtained from several automotive shops both locally and online. The part numbers you need are 9-5165-G (front) and 9-5161-G (rear). The only down side is that you'll need to slightly expand the bolt holes on the rear brackets to allow them to line up with the factory mounting holes on the rear axle. You'll need to shave about 1/8" off the side closest to the bar. This is a little time consuming, but in the end I think it's worth to have a squeak free vehicle. A dremel tool and small sanding wheel make pretty quick work of enlarging the bolt holes in the brackets.
The torque specifications are as follows:
Sway bar bushing bolts - 14 ft/lbs
Upper end link nuts - 14 ft/lbs
Lower end link nuts - 51 ft/lbs
I noticed an IMMEDIATE difference in the handling once these bars were installed. The entrance to my neighborhood has a nice set of short "S" curves and before I would struggle to roll through them at 20-25 mph. Now I can easily go through this same section at 40 mph without breaking a sweat.
One thing to be aware of is the fact that ADDCO had a bad batch of the rear bar (P/N 483) come off their production line. I ended up with one of these bars and they are about 1" too long. Prior to installing compare the ADDCO rear bar to the stock rear bar to make sure the end link eyelets line up. If they don't, you've gotten a bad one. ADDCO has excellent customer service and will handle the issue in the rare instance it arises.