Honda 919
Tail Section Modification
Part 3: Flasher Upgrade
October 2002
As mentioned in "Honda 919
Tail Section Modification Part 2: Turn Signal Integration"
integrating the turn signal into the rear tail light causes the turn
signal to flash faster than stock when the brakes are applied.
I've ridden my 919 like this for some time, but decided to go ahead and
upgrade the flasher to slow the turn signal back down. I did this
more out of boredom due to the weather turning cold and not being able
to ride the 919 much, but now that it's done I like it better.
It's a very cheap and simple upgrade so if you're not happy with the
turn signal flash speed after integration this is a simple solution.
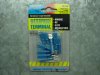
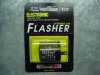 The
parts you will need are a Tridon Stant EL12 Heavy Duty Flasher or the like, some
14-16ga waterproof terminal connectors (male and female), a couple of zip ties, about a foot
of 14ga wire, and a small metal clip of some type. The wire will be used to make
the stock wiring a tad longer and the zip ties and metal clip will be for mounting the HD
flasher back to the bike in the stock location using the metal clip.
The
parts you will need are a Tridon Stant EL12 Heavy Duty Flasher or the like, some
14-16ga waterproof terminal connectors (male and female), a couple of zip ties, about a foot
of 14ga wire, and a small metal clip of some type. The wire will be used to make
the stock wiring a tad longer and the zip ties and metal clip will be for mounting the HD
flasher back to the bike in the stock location using the metal clip.
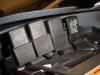 The
stock flasher is under the seat on the right hand side. It is the last
block in the rear of the relay pack. It will have "FE246BH" printed on the
flasher. It is attached to the motorcycle via a rubber grommet. Just
pull up and the flasher will pop loose. Unplug the stock wiring and clip
the connector off. On the stock flasher the
GRAY wire will go to the side
marked "L" and the
WHITE wire with
GREEN stripe will go to the
side marked "B". You may want to note this in the
event you want to change the flasher back to stock at a later time.
The
stock flasher is under the seat on the right hand side. It is the last
block in the rear of the relay pack. It will have "FE246BH" printed on the
flasher. It is attached to the motorcycle via a rubber grommet. Just
pull up and the flasher will pop loose. Unplug the stock wiring and clip
the connector off. On the stock flasher the
GRAY wire will go to the side
marked "L" and the
WHITE wire with
GREEN stripe will go to the
side marked "B". You may want to note this in the
event you want to change the flasher back to stock at a later time.
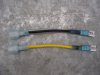
Once you've cut the stock connector off the wires, attach a
male terminal connector to each wire. The terminal connectors I use are
waterproof. They employ a heat shrink design to assure water tightness.
After splicing them in simply heat the covering with a match or lighter until it
shrinks around the wire. Make two jumper wires about 5" long with a male
connector on one end and a female on the other. These will be used to
lengthen the stock wiring to allow the HD flasher to mount in the stock
location.
 Attach
the jumper wires to the stock wiring. I recommend using two different
colors to keep track of which wire is which. I chose yellow and black.
Once the jumper wires are put in I taped the wires up with electrical tape to
protect the wiring.
Attach
the jumper wires to the stock wiring. I recommend using two different
colors to keep track of which wire is which. I chose yellow and black.
Once the jumper wires are put in I taped the wires up with electrical tape to
protect the wiring.
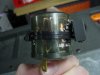
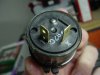 The
HD flasher has markings by the connectors to let you know which wire goes to
which connector. The
stock WHITE
with
GREEN stripe wire should go to the connector
on the HD flasher marked with an "X". The
GRAY
wire should go to the connector marked with the number "1".
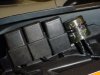
Finally, attach a metal clip of some type to the HD flasher using two zip ties.
The metal I used was an "L" bracket that I bent to more of a "V". This is
optional but allows you to attach the HD flasher back to the bike in it's stock
location using the stock rubber grommet.
The
HD flasher has markings by the connectors to let you know which wire goes to
which connector. The
stock WHITE
with
GREEN stripe wire should go to the connector
on the HD flasher marked with an "X". The
GRAY
wire should go to the connector marked with the number "1".
Finally, attach a metal clip of some type to the HD flasher using two zip ties.
The metal I used was an "L" bracket that I bent to more of a "V". This is
optional but allows you to attach the HD flasher back to the bike in it's stock
location using the stock rubber grommet.
Finally, turn the key on and test the turn signals.
They should now flash at the same rate whether the brake are applied or not.
Thanks to the "Honda919Rider" from the Honda Hornet Yahoo Message board for
turning me on to this flasher.
-Speedy919