TRD Supercharger Blog
I spent the first few months of Project SportRunner sprucing up the appearance. Once that was complete Project SportRunner needed to perform as good as it looked. I decided to install a TRD 3.4L Supercharger to up the performance of Project SportRunner to a respectable level. The stock 183 crank horse power (~140RWHP) just wouldn't cut it any longer. With the modifications I have in mind, I should be sitting close to 265 crank horse power once all is said and done (~225RWHP).
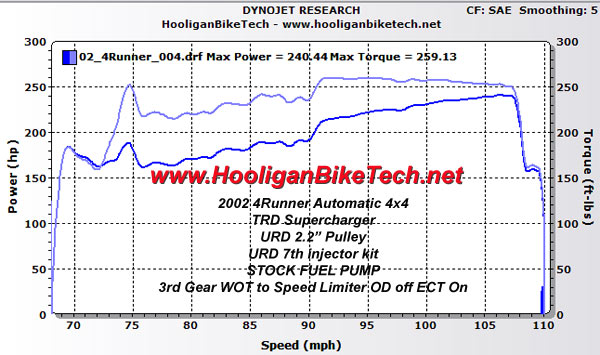
UPDATE: Dyno runs show I'm actually at 240 RWHP!!! (300 Crank HP with 20% drive train loss).
Installing a Supercharger on a Toyota 3.4L motor is more complicated than just bolting it on, regardless of what Toyota or TRD tell you. Many people have installed these units, and discovered the stock fueling system is unable to keep up with the additional air volume the Supercharger provides. I completed approximately 2 months of research to determine the most effective solution to Supercharging a Toyota 3.4L.
This was the largest project I had undertaken on Project SportRunner and it required A LOT of research. I read hundreds of forum threads on www.yotatech.com, www.customtacos.com, and www.ttora.com. I also read www.gadgetonline.com who was pretty much the pioneer to all the 4Runner supercharging solutions and co-owner of www.urdusa.com who sells all the items needed to make the Supercharger run properly on the 3.4L motor.
After about a year of work Project SportRunner is pretty much complete and I'm just going to drive and enjoy it. I'll post updates periodically to let you know how it's doing and of course to report any issues that arise, although I expect that unlikely. I've really enjoyed taking this daily driver and turning it into a MUCH more fun vehicle to drive. I've learned a lot along the way as far as what works and what doesn't and can carry that knowledge forward to future projects. For those just starting out, if you follow the advice I've given on this site you'll have a very reliable, powerful, and nice road mannered vehicle that is a 200% improvement over stock. I've kept the following blog on all the modifications and research.
After owning the 4Runner for over 20 years I started going through it with sort of a restoration in spring 2022. The following play list details the work.
Saturday March 11, 2017
I got bored, and decided to add more pep to Project SportRunner with the addition of a water methanol injection system and smaller 2.1" pulley. Results were better than I expected!
Saturday November 16, 2013
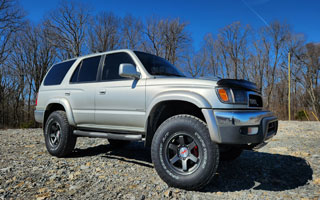
The factory original tires were shot after 11 years and nearly 100K miles and it was time to upgrade. New wheels and a mild lift were also in order. Click the image below for the "How To" video for the lift install.
Satirday November 2, 2013
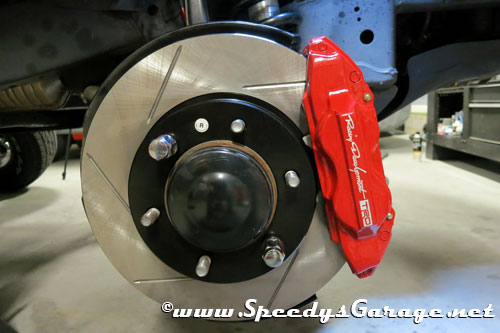
It's been a while since I've made any updates to the 4Runner and after 100K miles she needed some attention in the braking area. I installed the coveted Tundra Brake upgrade. Click the image for the "How To" video on the process.
Friday October 31, 2008
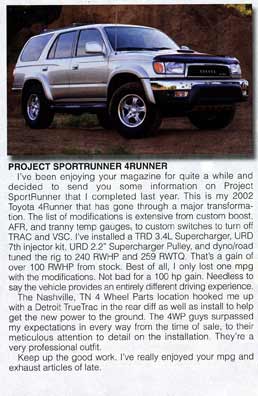
Last month I submitted a photo of Project SportRunner
to Off-Road Adventures magazine thinking it might get published. I
received the November 2008 issue today, and sure enough the picture was in
there. I get this magazine because I had 4Wheel Parts install the TrueTrac
LSD in Project SportRunner's rear diff. It's a pretty good magazine so if
you don't get it, sign up at
www.offroadadventures.com.
Sunday September 28, 2008
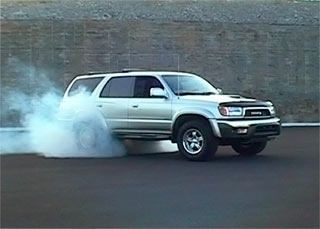
It's been a little over a year since I installed
the TRD Supercharger and other goodies on to Project SportRunner. I've had
zero problems and Project SportRunner is still a blast to drive. I have
been meaning to edit up some video show casing the results and I finally got
around to it. I normally baby Project SportRunner, but I did stretch its
legs a little to make this video. Don't try this at home kids!
Saturday April 5, 2008
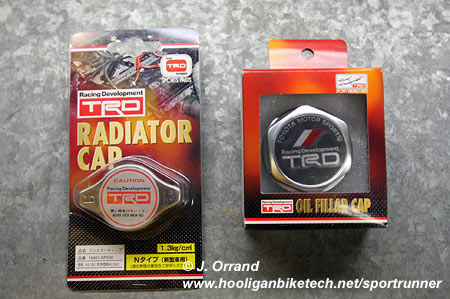
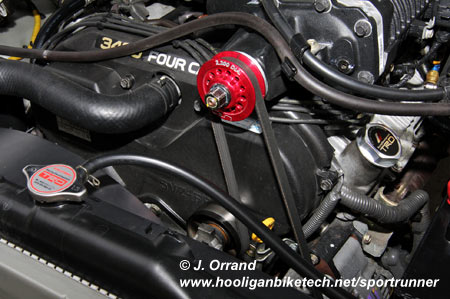
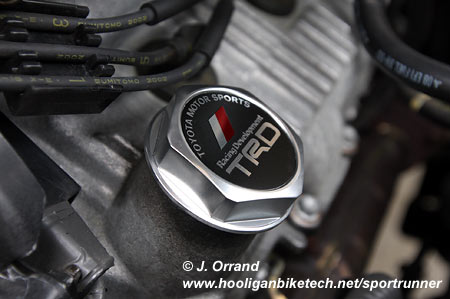
Today I installed a couple of bling parts. I
may take Project SportRunner to a couple of car shows this summer and wanted to
finish off the engine bay so I found a TRD oil cap and radiator cap. The
radiator cap releases at a higher pressure than the stock unit which is supposed
to help with cooling, but I don't put much faith in that. They do look
cool though, but are a little pricey since they come from Japan. There's
more Japanese text on the packaging than English.
|
|
|
|
|
|
Tuesday, March 25, 2008
Completely finished tuning tonight. I was
turned on to a new and very effective method to use for road tuning and it flat
works. Read about it and see updated AFR logs on the
TRD Supercharger Analysis/Tuning page. Project SportRunner is 100%
dialed in and very smooth with linear power delivery.
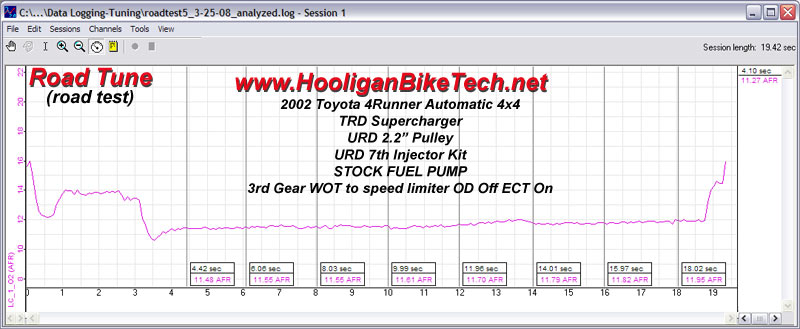
Sunday, March 9, 2008
After completing the
dyno tuning I ran some road
tests and logged the AFRs to see how they compared to the ones from the dyno.
What I found is that I needed to lean the map up a bit for the road. This
shows how important it is to road tune a vehicle. I believe the wind/road
resistance present during a road test affects how the fuel is used by the
vehicle and thus the resulting AFR. I've updated the
TRD Supercharger Analysis/Tuning page to show the AFR logs from dyno, the
dyno map road tested, as well as my adjusted road tuned map.
Wednesday, March 5, 2008
After double checking my tune a couple of weeks
back, I finally had the opportunity to schedule a
dyno session. I
must say I'm THRILLED with the results of the modifications I've made. I
knew the vehicle was performing well by the way it drove, but it exceeded my
expectations. I showed a tick over 240 RWHP and 259 RWTQ. I'm not
sure where the HP peak is in the RPM range, but this 240HP was happening around
5100 RPMs. Unfortunately, I hit the vehicle speed limiter at 108 MPH and
the truck would never get to the rev limiter to see the full power range.
This leaves me wondering if there were a few more ponies to go yet. Check
back soon for a page on the dyno process and how it was done.
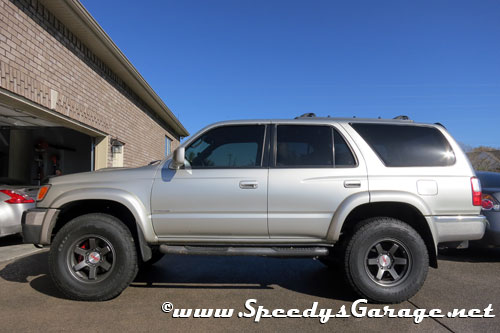
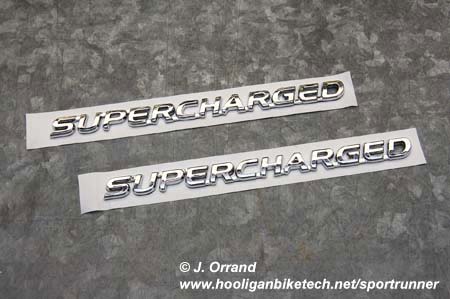
Sunday, March 2, 2008
I finally got a decent day weather wise and washed
the 4Runner so I could install the
"Supercharged" badges. They're the
perfect size, kind of subtle, but still there, and go well with the theme of the
vehicle.

Tuesday, February 19, 2008
The Supercharged badges showed up today.
They look great, very high quality, and the perfect size. These are going
to be a nice finishing touch to Project SportRunner. Now I just need to
wait for a decently warm day to give the 4Runner a bath so I can install them.
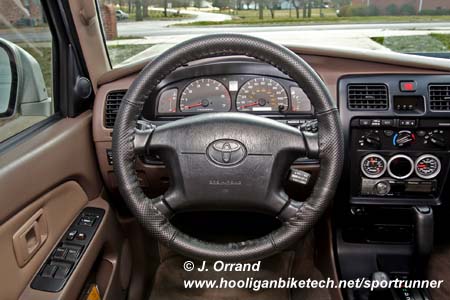
Saturday, February 16, 2008
I had a $50 gift certificate from Performance Products that was about to expire.
I didn't really need anything for the 4Runner, but I had to use this thing or
lose it so I went with one of the Europerf leather wheel skins. My
steering wheel was already leather but the previous owner or the dealer I bought
it from had scratched the leather in a few places so this was a decent solution.
I usually hate these types of wheel covers, but this one is actually very nice
and was $49.90 shipped which sure beat the $800 price I was quoted from the
dealer for a new steering wheel. If I hadn't had the gift certificate I'd
never have gotten this, but it worked out good in the end.
Thursday, February 14, 2008
I had been playing around with the idea of putting
some badges on Project SportRunner to denote it's Supercharged status.
Most of the ones I found on Ebay looked very cheap, so I had to really do some
searching. There are several offerings from various OEM car manufactures
such as for the Chevy Cobalt, or Cadillac, but I ended up finding some that I
think fit the style of Project SportRunner perfectly. They're 6 inches
long and 1/2 inches tall, chromed, and all the letters are connected together
for easier installation with the 3M foam tape backing that comes on them.
I found these at
www.sfxperformance.com. A little pricey, but I think worth it to
finish off the project for now.
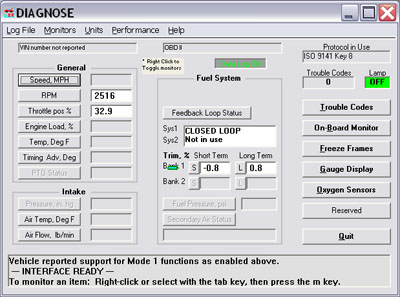
Saturday, February 9, 2008
Miles on Supercharged motor: 4,507
Miles on 2002 4Runner 71,268
The 4Runner is still running flawlessly with the Supercharger. I decided to check the tune to see if it needed any tweaking at this point. I did several wide open throttle runs down the highway and the AFR gauge a very steady 11.8. Every once in a while it'd drop down to 11.5, but 11.8 was pretty consistent. I then hooked up the laptop with the OBDII BR-3 and did some monitoring with the Diagnose software to check the closed loop long term and short term fuel trims. When doing this type of checking you can't expect the long term and short term trims to just remain constant. It's just the nature of the ECM to bounce around some, but for the most part mine are still right on the money, cancelling each other out meaning the tune is very good. I had a feeling it was based on the smooth and torquey power delivery of the vehicle, but it's nice to have it confirmed with hard data as well. I took a couple of screen shots as well.
Monday, January 28, 2008
I was finally able to exhibit a little self
control for a full tank of fuel in order to ascertain the gas mileage of the
Supercharged 4Runner. I'm happy to say gas mileage stayed very close to
stock at 19.34 MPG vs. a best of 21.05 MPG naturally aspirated.
These tests were performed traveling the same route over a week's time which
consists of a 60/40 hwy/city split. When driving more aggressively my gas
mileage is in the 17-18 MPG range with mostly city driving. I consider
that VERY good for the amount of enjoyment I'm getting from the vehicle.
Saturday, January 12, 2008
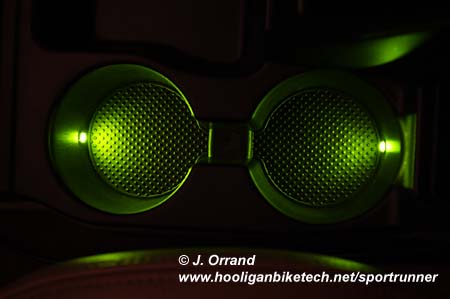
Today I installed some
accent lighting into the cup holders so I can more easily find them at
night. I should have done this a LONG time ago.
Saturday, October
13, 2007
Today I put on a "Sport Edition" front skid plate. Not so much for
protection, but I've just always liked they way these looked. They were
only available on 2002 4Runners designated as a Sport Edition model. These
things used to cost about $300 - $400 depending on what dealer you called.
They are now clearanced so grab one while you can. The price has gone down
to clear dealer inventory, but once they're all gone expect the price to go back
up as dealers run out and you have to get them from third parties.

Friday, September 14,
2007
I had the stock exhaust put back on today and am
much happier. I kinda like the sleeper effect the stock exhaust gives as
no one expects a 4Runner to blaze away from a red light with the only sound
being the whine of a supercharger
![]() .
.
Thursday, September 13,
2007
I had the custom cat back put on today. The
shop did a good job with it, but the drone at 1800 RPMs is just too much for me
and having an automatic transmission it's in the 1800 RPM range a lot when
driving around town. On the highway it's not bad at all and when you get
on the throttle it sounds pretty good, but I'm going to go back to the stock
exhaust. I had the custom cat back run straight out the back and although
it looks good, you can smell the exhaust in the cab with the back window down.
It seems the stock exit location is the best option.
|
|
|
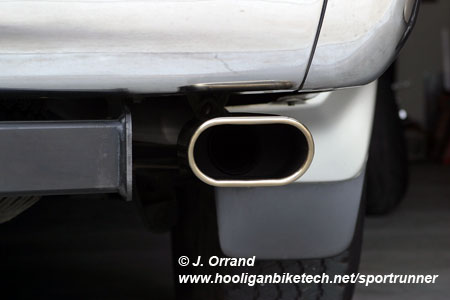
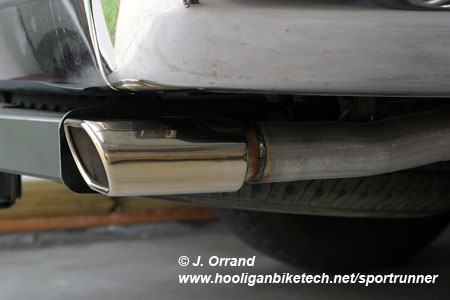
Wednesday, September
12, 2007
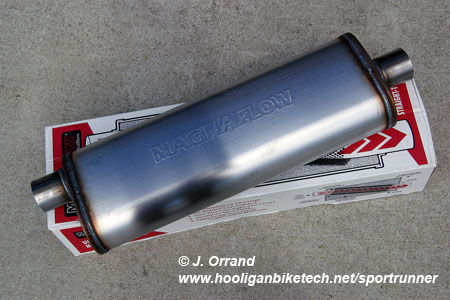
The muffler and tip arrived today. The tip
isn't what I expected so I picked up a different one from a local exhaust shop
and I'll send this one back. The Magnaflow tip has a resonator type insert
which kinda looks weird to me and isn't visible in any of the online images.
|
|
|
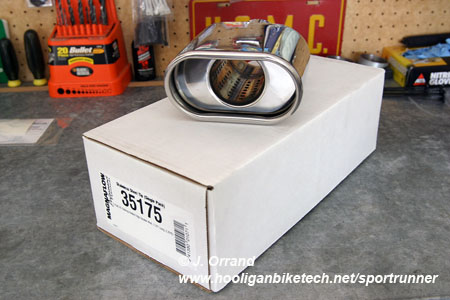
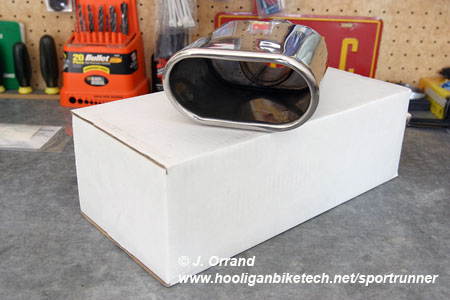
Saturday,
September 8, 2007
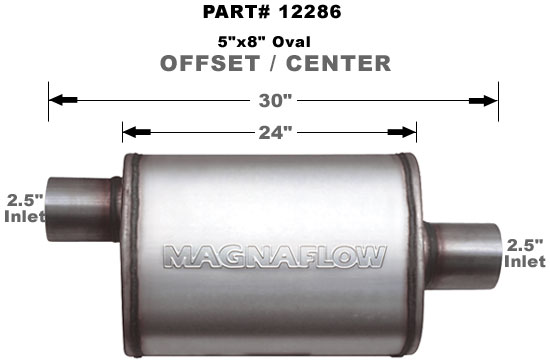
I ordered a Magnaflow muffler P/N 12286 and tip P/N 35175 today. The
muffler I chose has a 8" wide x 5" tall x 24" long body, 2.5" center inlet and
offset outlet, and is satin stainless steel. I chose a stainless Magnaflow
tip that is oblong in shape and should look great looking straight out the back
of the right side of the vehicle. I'll try to get these parts installed
next Thursday or Friday. I'll have the shop use 2.5" pipe for a freer
flowing exhaust which should help now that the supercharger is installed.
It should have a nice sound as well, not too loud, but just enough....I hope.
Pictures courtesy of Magnaflow.
|
|
|
Friday, September
7, 2007
After much searching I FINALLY found an exhaust flange to use for my custom cat
back exhaust. I went to three exhaust shops, two salvage yards, and made
several phone calls as well as an online search. I finally found a salvage
yard with a 4Runner I could get a flange off of. They raped me on the
price of $35, but this is the only place I found one. We went to a 99'
totaled 4Runner they had in the yard and the guy used a hack saw to cut off the
last 6" of the pipe as it came out of the muffler toward the front of the
vehicle. This is where it connects to the stock cat. I'll use this
flange to bolt up to my cat and have the exhaust shop build the rest of the
system from there. This will allow me to keep my stock exhaust completely
in tact and bolt it back on later should I need to for some reason.

Thursday,
September 6, 2007
During my initial research I found a local transmission shop that was
knowledgeable on the A340 auto trans in our 4Runners. I talked to them
about possibly doing valve body work should it be deemed necessary after the
supercharger was installed. The master tech does this type of work
frequently for the mail jeeps that use this same transmission. He said to
bring the vehicle back once the SC was installed and he'd see how it felt, so I
went back today. He checked the fluid, smelled it, etc. He then did
some forward, reverse, 1, 2, etc testing in the parking lot. We then went
on a test drive. He started off with just normal driving listening to how
the transmission shifted and watching the RPMs. He then turned down a back
road and stopped and told me he was gonna give it some go pedal, I nodded and
off we launched. He watched the instruments until we hit about 60 or so.
His prognosis was that the transmission is shifting perfectly solid and firm and
he DID NOT recommend valve body work. His exact words were "you do not need to
worry about transmission failure related to this supercharged motor". He
went on to say that these transmissions are very tough and that the failures
he's seen were related to bearing failures, which can happen with or without
valve body work.
I'm not a drag race from red light to red light kind of guy. I built Project SportRunner to be a daily driver that was more manageable to merge onto highways, not to smoke the tires every time I did a standing start. For my driving habits I'm going to follow this man's advice and leave the transmission alone for now. My concern of doing valve body work is having abrupt shifting after the modification is complete. The transmission tech told me that abrupt shifts were part of it. I don't drive my 4Runner hard enough to justify living with abrupt shifts for daily driving.
I'm not telling anyone to NOT upgrade their valve body. That's something each individual will have to decide for their own project and driving style. For me, I'm gonna see how it goes and if I have trouble with the transmission down the road I'll take it as a lesson learned, get it fixed, and take the steps required to prevent further issues.
Saturday, September 1,
2007
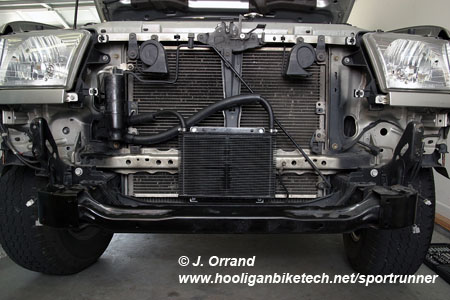
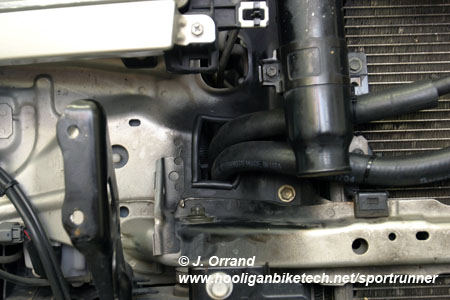
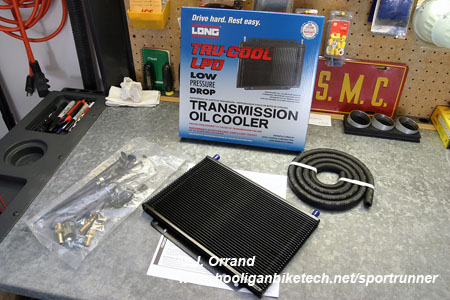
I got the Tru Cool tranny cooler
installed today.
For something that only consisted of 8 bolts and two hoses it turned out to be a
real pain to get it installed just how I wanted it. My hands and fore arms
are busted to pieces as well. The fins on the A/C exchanger and the hose
clamps on the transmission lines are sharp! I probably did a couple of
extra steps than most people would as I tried to think of how Toyota would have
done it had it come from the factory, but none the less it's done, solid, and
should last the life of the vehicle with the way I did things.
|
|
|
Thursday, August 30,
2007
The Tru Cool 4454 showed up today. I'll get
it installed this weekend. It looks like a very nice unit and very
complete with two mounting options. I'll use the metal brackets for my
install as I like things bullet proof.
Monday, August 27, 2007
Today I ordered a Tru Cool 4454 low pressure drop
transmission cooler. I've been monitoring tranny temps since installing
the supercharger and I've noticed about a 20 or so increase in temps compared to
stock. This tranny cooler should bring those temps back down to where they
were stock.
Sunday, August 26, 2007
I spent a lot of time yesterday and today tuning
Project SportRunner. I had my girl drive as I monitored the laptop,
listening for ping, monitoring air fuel ratios, and long term and short term
fuel trims. We found a pretty desolate section of highway and did some
wide open runs as well to make sure things were in check. Gadget from
Underdog Racing also provided some over the phone support and a peek at a timing
map he'd created to get me going in the right direction. At this point
tuning is pretty much wrapped up. I'm going to drive the vehicle as is for
a few weeks then hook the lap top back up to make sure nothing needs touching
up.
The truck is running superbly. The power is very linear and all of the areas where I'd feel power surges have been eliminated. I feel comfortable that the truck is likely tuned better than when it came stock from Toyota which gives piece of mind for the longevity of the supercharged power plant. Next I need to focus on the transmission.
Wednesday, August 22, 2007
URD didn't have any idea as to why my FTC was
buzzing so I gave Split Second a call as they're the ones who engineered the
AIC-T ECU. Split Second recommended I trim the black rubber hose coming
out of the AIC-T so that the hard nylon boost line would slide all the way into
the AIC-T box. I made the change and it solved the buzzing problem.
Now the AIC-T is completely silent. Now I just need to get Project
SportRunner tuned.
Saturday, August
18, 2007
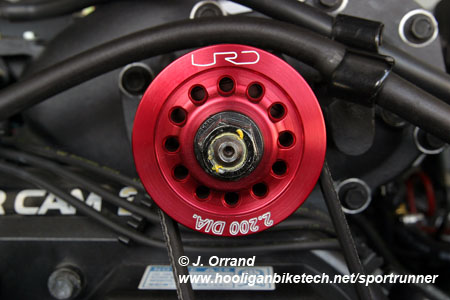
I installed the
URD
2.2" Supercharger Pulley today. The stock 2.37" TRD pulley showed 7
psi on Project SportRunner. The URD 2.2" pulley is showing 9 - 9.5 psi.
I'm estimating a gain of about 20 RWHP. I didn't think I'd notice a 20HP
gain, but it's very noticeable. Boost comes on much faster with less
throttle input. Now I just need to finish tuning.
Saturday, August 11,
2007
I got up early to beat the 100+ degree weather and
installed the URD 7th Injector that came as part of the
URD 7th Injector Kit. The install was a piece of cake and everything
fit exactly like it should. The kit included an upgraded fuel pump, Walbro
190, but it doesn't look like my vehicle is going to need that component.
I've started a base fuel map for the additional injector and I'm only needing to
add fuel right near red line, and then very little. I'm shooting for a
consistent 11.8 - 12.0 AFR through the boost range. Next is the 2.2"
pulley, then I'll really dive into tuning.
Wednesday, August 8,
2007
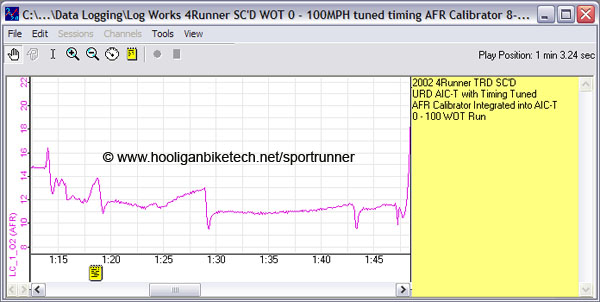
Tonight I did some WOT logging using the LC-1 and
LogWorks program. Unfortunately I can't log RPM, but I can log AFR.
After installing the AFR Calibrator, it seems my WOT AFRs have leaned out some
making my 3rd gear WOT runs not so rich as now they're at around 11.0 rather
than 10.2. I'm hoping that after installing the 2.2" pulley they'll lean
out even more getting closer to 11.8 - 12.0. The places in the log where
it spikes are gear changes.
Saturday, August 4,
2007
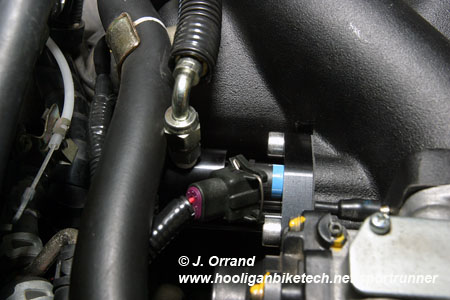
I installed the URD AIC-T today and hooked up
everything but the 7th injector. I setup a base timing map and went for a
test drive and I'm happy to report the ping is gone. The AFR Calibrator
portion seems to be doing it's thing as well. In closed loop boost my AFRs
drop from 14.7 down to 13.5. I'm not sure if they should drop lower than
that or not, but as of now they haven't. The MAP sensor on my AIC-T is
buzzing when the system is under boost so I need to ask URD about that. So
far so good on the tuning front.

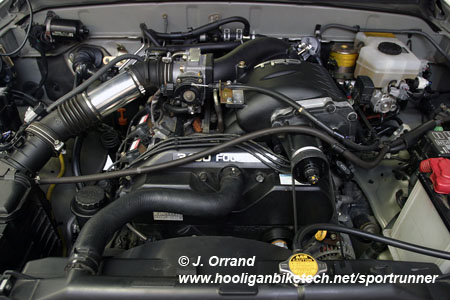
Saturday, July 28, 2007
After months of research and preparation, the
supercharger is installed. I'm decent with a wrench, but I was surprised
at just how easy it is to install. The TRD instructions are very good,
only lacking torque specs on factory bolts. I would encourage anyone even
moderately decent with wrenches to install this yourself as it'll give you a
firm understanding of how everything works, and you can spend that $600 - $900
install charge on other goodies. I said some prayers before firing it up
and had success on the first crank! I've started a page on the
Supercharger,
so check it out for more details and a quick install video. So far I'm
loving this thing.
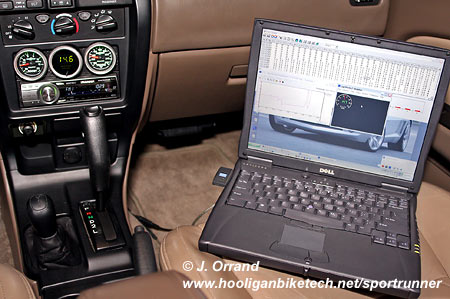
Friday, July 27, 2007
Tonight I went out with the BR-3 OBD II tool
connected to Project SportRunner and a laptop. I also had a video camera
strapped to the center console arm rest recording the gauges. I went to a
long stretch of desolate highway and did several WOT runs from 0 - 100 MPH and
recorded my gauges with the video camera, and logged the sessions with the BR-3
diagnostic software. This will give me data to compare to after the
supercharger is installed. I'm mainly interested in the AFR and timing,
but I logged pretty much everything in the BR-3 software for good measure.
The more powerful the laptop the better as it takes some CPU cycles to read all
the data streaming in. My trusty old Dell with a 1.8Ghz PIV M did the
trick pretty well, so if you have something similar or better I'd say you're
good to go. I'll perform these exact same tests under the same conditions
after the supercharger is installed and compare the data. This will make
tuning much simpler.
Thursday, July 12, 2007
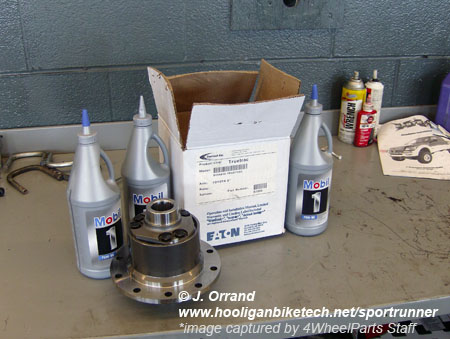
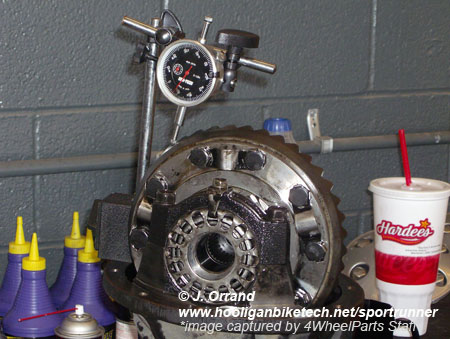
A local 4WheelParts shop installed my Eaton
TrueTrac today. They really went out of their way to provide great
customer service. They lined the truck with plastic, even the steering
wheel, to keep any grease from getting on anything. I asked if I could
take a few photographs of the install and they said due to insurance reasons I
couldn't go into the shop area, however they offered to take the pictures I
wanted with their camera and send them to me. I asked for four different
photographs and was shocked when I went to pick up the truck and they had taken
about 15. They did an excellent job and even did a detailed check off list
before handing the keys back over to me showing that each bolt had been torqued
to proper specs and had the technician that torqued them noted on the check off
list. Impressive. Add to that the fact that I got in on a 50% off
installation sale, and I came out very good.
So far I'm VERY impressed with the TrueTrac. I was able to put one rear tire on gravel and the other on dry pavement and hammered the gas and did not get any wheel spin at all. Add to that it's absolutely silent when driving around and makes no noticeable difference in the way the vehicle drives and you've got a winner. The part number for the V6 rear end is 913A610.
I'll drive it for a few miles and post an update. The unit was installed at 66,470 miles on the clock of Project SportRunner.
|
|
|
Wednesday, July
11, 2007
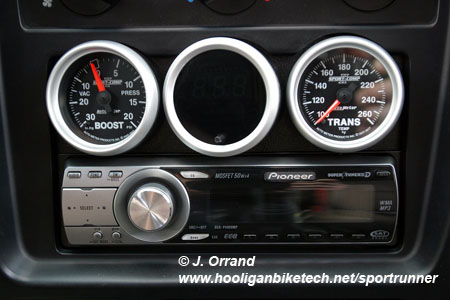
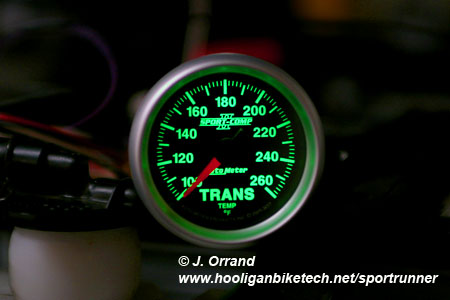
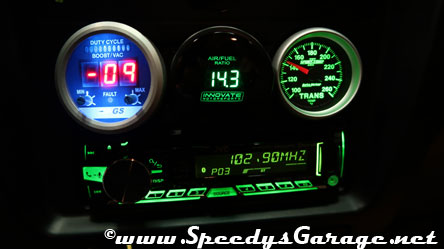
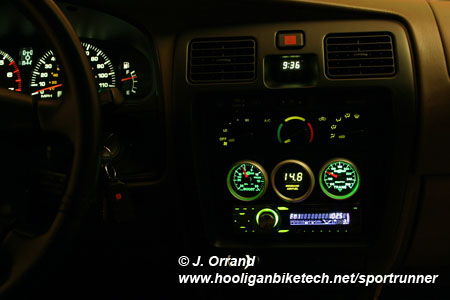
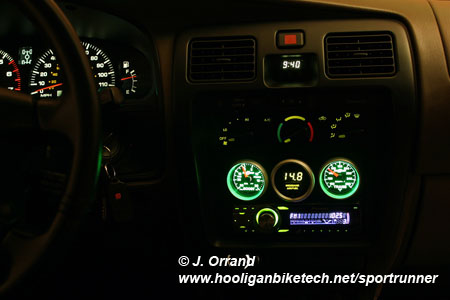
The Auto Meter dimmer (P/N 9114) showed up today and I put it in the truck.
This made a HUGE difference and made it so I can dim the Auto Meter LED gauges
down to match the illumination level of the stock gauges. Without the
dimmer the Auto Meter gauges were very bright and distracting at night.
Here's a shot of the gauges at night with dimmed and full bright. In
person the gauges are even brighter than they appear in the full bright photo
below.
Both of the images below were taken at a shutter speed of four seconds and a 4.0
aperture on a tripod mounted Canon digital SLR camera with a Sigma EX 28-80 lens
at 32mm and ISO 100.
 |
 |
|
Dimmed to match OEM dash illumination. |
Gauges at full bright. |
Tuesday, July 10, 2007
Made an appointment to have the True Trac LSD
installed for Thursdsay, July 12, 2007.
Monday, July 9,
2007
I've been doing some monitoring and testing with the new gauges. What I've
found is that when I stab the go pedal the AFRs drop from 14.7 to 11.1 - 11.5
and stay there until I let off. I'm surprised it goes that low stock.
I'm curious to see what it will be after the SC is installed.
The tranny temp gauge likes to stay around 160* F when cruising. The highest I've seen was 200* F for a few minutes in stop and go traffic and 97* F weather. Once the torque converter locks up the temp drops 15 - 20 degrees pretty quickly.
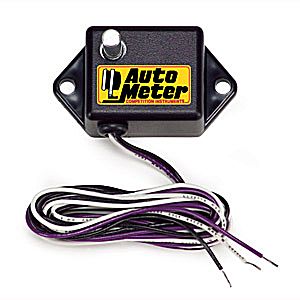
I also ordered the Auto Meter dimmer today as well. Those gauges were pretty bright at night and since they're LED illuminated they can't be tied to the factory dimmer. The Auto Meter dimmer is an easy three wire hookup. Picture courtesy of Auto Meter.
Sunday, July 8, 2007
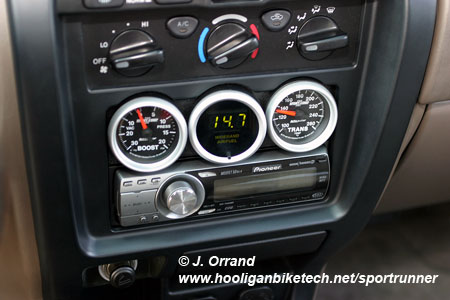
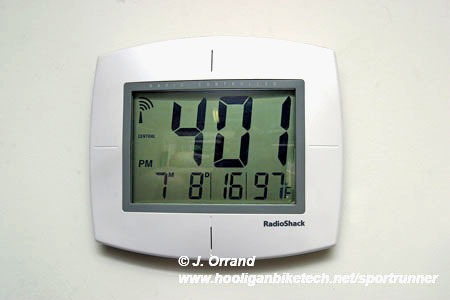
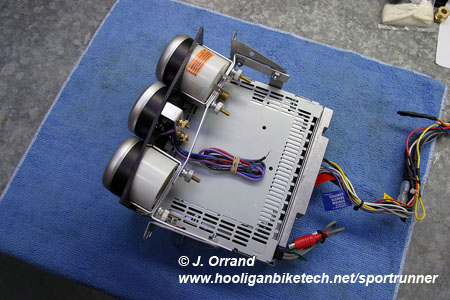
FINALLY, I'm finished with the gauges. That
had to be the most tedious project I've ever undertaken. The job wasn't
hard, but there were wires all over the place and keeping them organized, well
protected, and blended into the vehicle to look like they were stock really took
a lot of work. I spent about 2 hours Friday, 8 hours Saturday, and 5 hours
today getting everything completely finished. I said a few prayers before
firing the truck up the first time and everything worked perfectly. The
worst part was the heat. It was 97* F in my garage and that's with fans
running. The 32% humidity made if feel like 100* F.
The Auto Meter gauges are pretty bright when illuminated. I may have to get the Auto Meter dimmer, but will drive it as is for a week to see if they're distracting.
Here's a shot of the gauges as viewed from the driver's seat as well as a shot of the wall clock showing the temp! Boost isn't hooked up yet. I'll have to do that one when I get the SC installed. For now the tube is coiled and tied off in the engine bay.
|
|
|
Thursday, July 5,
2007
The high temp split loom wire wrap showed up today. I'll get the gauges
100% by the end of this weekend!
Saturday, June
30, 2007
I got the dash panel modified and did a test fit of the gauges in the DIN area.
I'm shocked at how well it turned out. There was a lot of testing,
fitting, sanding, testing, fitting, etc. Luckily I'm like a surgeon with a
Dremel tool from all my years working on motorcycle body work. The end
result is perfect. My goal was to make these gauges look like they came in
the vehicle, and that's exactly what I got. The work was definitely worth
it. They sit at a 10 degree angle toward the driver making visibility
great, as shown in the photo below taken from the driver's perspective.
Boost is closest to the driver, then digital AFR, and finally tranny temp.
Next I'll work on wiring them up.
|
|
|
Friday, June
29, 2007
Ordered some high temp split loom wire wrap for any gauge wiring that will
come into close proximity to the engine or exhaust such as the tranny temp
gauge or AFR gauge. This delays my plans of wiring the gauges this
weekend, but I wanna be sure to do it right.
Thursday, June
28, 2007
Installed the R4 tuning software as well as the OBDII BR-3 Diagnostics program
on my laptop to make sure everything worked. I also hooked up the OBDII
BR-3 to the 4Runner and my laptop and had my gal drive me around while I
familiarized myself with the software. That OBDII BR-3 is VERY handy even
if you don't plan on getting a SC. I highly recommend
getting one for vehicle diagnostics.
I also began working on fabricating the bracket that would be used to install the gauges in the DIN slot. I probably worked on the bracketry for around 3-4 hours to get everything perfectly aligned and solid. Next I'll begin working on the dash panel to fit these into the DIN slot. My goal is to make these look factory installed.
Saturday, June 23, 2007
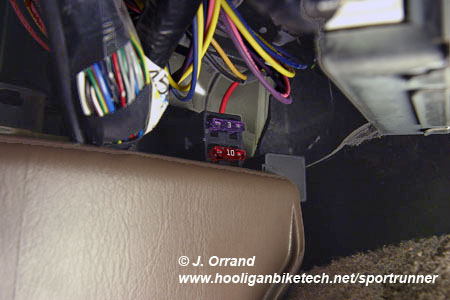
Got the Painless Wiring Cirkit Boss installed.
See the article
here.
Tuesday, June 19, 2007
Received my gauges back from Auto Meter with the
green led boards installed. They look awesome and it was definitely the
right choice. If you want to have some custom work done to Auto Meter
gauges give them a shout at
www.autometer.com and I bet they can work with you. Here's a shot of
my gauges after the green led boards were installed. Prior to this they
lit up white. I just quickly hooked them up to the battery to make sure
everything was satisfactory before installing them. I must say Auto Meter
did an awesome job. You can't do this yourself as the bezels are crimped
on and require special tools to remove and new bezels and lenses when replaced.
|
|
|
Monday, June 18, 2007
Received the URD goodies. There was one
discrepancy in that I ordered the AFR Calibrator that was programmable and URD
shipped a unit that incorporates the additional injector controller, timing, and
AFR calibrator in a single device. The upside to this is that it takes up
less space as it's only one box to locate in the dash, and it's easier to wire.
The down side is that when the AFR calibrator is incorporated it can not be
programmed independently and comes with a pre loaded map. I gave URD a
call to see about this and they offered to ship me out the programmable AFR
Calibrator asap and apologized for the mistake, but after talking to the guys
there I'm going to keep this unit. The AFR Calibrator has a very small
margin of programming and the guys at URD feel they have perfected a map that
will work with 99% of supercharged 3.4L motors. The programmable unit
would only be necessary if I planned on doing some water meth injection or other
wild stuff to get more power, which I don't plan to do. If for some reason
the pre defined map doesn't do what I need it to, I'll give URD a call to send
me the programmable AFR Calibrator. It's only a 4 wire hookup and simple
to install should I need to go that route.
After looking all over I finally found a 10 x 1.25 tap to clear the holes in the block where the dynamic tensioner bolts will live. I found the tap at ACE Hardware.
Sunday, June 17, 2007
Found Redline's Water Wetter on sale at a local
auto parts store and snagged a bottle. A while back I was talking to one
of the VERY knowledgeable TRD techs and was instructed to use this product to
aid in cooling as well as cooler spark plugs and cooler thermostat. He
also said to run a 70/30 mix of water and antifreeze rather than the typical
50/50 mix. Other's have also reported that pinging went way down after
putting Water Wetter in the radiator. If you want to read up on it check
out
Redline's info. There's a nice video on the site that explains how
Water Wetter works. It's said to drop temps by about 20 degrees. Not
bad for less than a $7 investment.
Thursday, June 7,
2007
Placed an order with www.urdusa.com for
their 7th injector kit, AFR Calibrator, 2.2" Supercharger pulley, OBDII
BR-3, and Serial to USB adapter. I also upgraded the spark plugs in the 7th injector kit to the Denso Iridiums. URD was out of the 2.2" pulleys but plan to have some delivered
on June 11. I told them to just ship everything at the same time as I
still have a few other projects to complete before moving to the Supercharger,
such as the gauges, and True Trac LSD.
Saturday, June 3,
2007
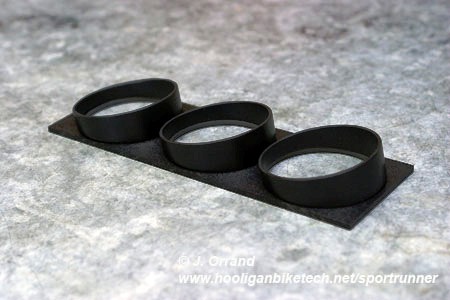
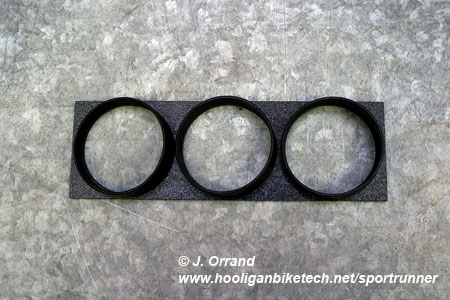
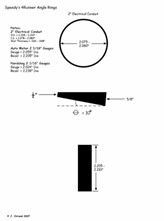
Completed DIN gauge panel and angle rings for boost, transmission
temperature, and AFR gauges. Still waiting on boost and tranny temp gauges
to come back from Autometer with green LEDs.
|
|
|
Monday, May 21,
2007
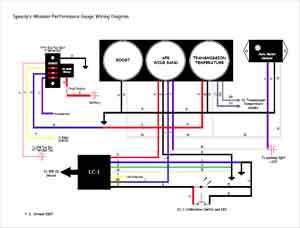
Today I completed the wiring diagram for the gauges and have a good idea of
where I'm going to run all the wires to blend them in with the factory wiring
system. I've also figured out a good spot to mount the Cirkit Boss, which
I'll use as a separate fuse block to power the gauges and LC-1 to keep them
isolated from the factory electrical system. I also transferred all my
hand drawn blue prints of the angle rings and DIN gauge mount to software and
finalized their design. I shipped the Sport-Comp II boost and transmission
temperature gauges off to Auto Meter to have the white LED board swapped
to green so that the illumination matches
the factory dash lighting. I still have just a little bit of finishing
work to do on the angled bezels to get them completed.
|
|
|
|
Saturday, May 19,
2007
Stopped by a local hardware store for some supplies and enlisted my Dad's help
to fabricate the angled bezels for the AFR, tranny, and boost gauges. It
was actually pretty easy and a lot cheaper than paying a machine shop $40.
We even made a few extra just in case. I'll continue to clean them up, the
Dremel is my best friend, and prep them for a semi gloss black paint over the
next few days. Began the wiring diagram for the gauges to know how best to
run all the wiring for a clean install.
Thursday, May 17,
2007
Went by a local machine shop to see what they would charge to do the cuts for my
angled gauge bezels. I was shocked when the guy told me he would charge
$40 to make the necessary cuts and that's if I supply the tubing!
OUTRAGEOUS for something that will take them 15 minutes. I'll find a way
to do it myself.
Wednesday, May
16, 2007
Completed DIN panel for the AFR, tranny, and boost gauges. The next step
is to pick up the proper tubing to make the angled bezels before sending the
gauges off to Auto Meter to have the LED board switched out. I've also
started drawing out the wiring diagram for all the gauges and LC-1.
Monday, May 14,
2007
After some pressuring at Auto Meter support, I was transferred to someone who had
a thorough knowledge of the gauges and wiring. This Auto Meter
representative confirmed that the sender does share the ground with the gauge,
meaning I can not connect it to the factory dimmer. I will look into other
solutions such as Auto Meter's 9114 LED dimmer, or build my own dimmer circuit.
I was also informed that Auto Meter can swap out the white LED board for a green LED board so that these Sport-Comp IIs match the factory dash illumination. I plan on sending them in to Auto Meter to have this modification made. The cost is $25 per gauge to cover the new bezel, lens, and led board.
Sunday, May 13,
2007
Completed prototype DIN gauge panel and blue print for design of the DIN panel
and angled bezels. After several designs I believe a 10 degree angle
toward the driver will work best.
Saturday, May 12,
2007
Tested Auto Meter Sport-Comp II Full Sweep Electric Transmission Temperature
Gauge to determine if the sender would have to be grounded if mounted in the
soft rubber line. I hooked the gauge up to the vehicle battery and dropped
the sender into a cup of hot water. The gauge read correctly proving the
sender did not need to be grounded. I suspect the sender shares the ground
with the gauge, meaning I won't be able to hook the gauge to the factory Toyota
dimmer as Toyota adjusts ground rather than voltage. Hooking to the Toyota
dimmer will cause the gauge reading to fluctuate with dimmer setting.
I also did some shopping and picked up 16ga white, red, and blue wire for wiring up the gauges, a 3/8" brass "T" with 3/8" barbs for attaching the transmission temperature gauge sender to the soft rubber line coming out of the transmission, and some assorted sizes of heat shrink tubing. I also picked up some green LEDs and holders to replace the LC-1's red calibration LED indicator as well as some rosin core solder and resistors to wire up my own LC-1 calibration LED.
Tuesday, May 9,
2007
4WheelParts called to let me know the TrueTrac LSD had arrived. I'll make
an appointment to get it installed in a week or two.
Monday, May 8,
2007
I didn't like the push button for the LC-1 as it was too large for my tastes so
I picked up a micro momentary push button from Radio Shack to build my own.
I also built a green LED unit with dash holder to replace the LC-1's red
calibration LED. The reason for this was so the LED would match the
factory dash lighting.
Wednesday, May 2, 2007
Completed initial design for gauge installation DIN panel
Sunday, April 29,
2007
I had been considering ways to aid traction as the differentials in Project
SportRunner are open, meaning only one wheel at each axle gets power. From
my reading, the supercharger can easily over power this one wheel so I was
thinking a limited slip of some type was in order. After doing some
checking around I decided on a TrueTrac limited slip unit as it is gear driven
and doesn't have clutch plates to wear out. I was going to wait a while to
get it, but a 4WheelParts retailer opened in my area offering 50% off on any
installation through April 30, 2007 so I went ahead and put in an order.
The TrueTrac was about $30 less than I could find it online, and with 50% off
the install I got a great deal. There is no time limit as to when I have
to have it installed, so I can do so at any time.
Sunday, April 22, 2007
Completed normally aspirated 93 octane gas mileage research
- result = 21.05 MPG 60/40 hwy/city*
*all gas mileage figures were the average of 4 consecutive tanks of fuel running basically the same route over a 4 week period
Monday, April 16,
2007
Went to a highly recommended exhaust shop to have the down pipe studs
repaired. All three studs were drilled out and replaced with 5/16 grade 8
bolts and nuts. The repair is now stronger than it was stock, but this was
an expensive fix as it took the technician about 4 hours to do the work.
Luckily he did not have to remove the down pipe as that would have been 12 hours
of labor due to having to drop the transmission. I will use this shop
exclusively for exhaust work from now on. I'm going to take a week or so
off from this project to recover from this expensive issue.
Sunday, April 15, 2007
Went to the home of a local performance shop employee to get the wide band
bung fixed. He removed the down pipe containing the first catalytic
converter to fix the weld on the stainless steel bung. The weld was fixed,
however 2 of the down pipe studs snapped on re-installation. Lessons
learned, make sure exhaust parts are cooled for a couple of hours before working on them and never use
impact guns on exhaust bolts.
Saturday, April
14, 2007
Stopped by a local exhaust shop to have a stainless steel wide band bung
welded into my stock down pipe before the first catalytic converter for the wide
band sensor. The exhaust shop did a messy weld job and it leaked.
The shop did not remove the down pipe and tried to do the welding on the truck
with the pipe on the truck.
Always remove the down pipe to get a clean weld and install of the bung.
Luckily this was extremely cheap so I wasn't out much money at all. I did
not want to have them fix the work as I was afraid they would make it worse.
Thursday, April 12,
2007
Visited a local audio specialty shop to pick up
some plastic dash panel for the custom gauge install
Tuesday, April 10, 2007
Purchased Auto Meter Sport-Comp II full sweep electric transmission temperature
gauge (P/N 3657) and Auto Meter Sport-Comp II mechanical boost gauge (P/N 3607)
as well as a Painless Wiring Cirkit Boss to isolate the gauge and LC-1 wiring
from the factory electrical system.
Tuesday, April 3, 2007
Purchased custom
Nordskog digital AFR gauge with silver bezel and green LEDs.
Nordskog had some of the best customer service I've ever experienced. Even
the girl answering the phone was knowledgeable about their products.
Friday, March 30, 2007
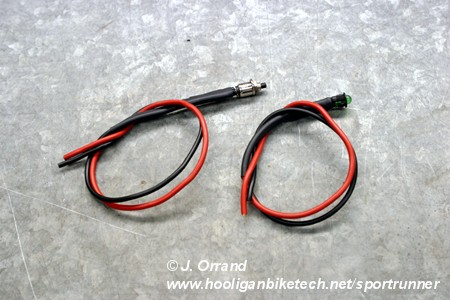
Purchased Innovate LC-1 wide band kit
Monday, March 26,
2007
Completed normally aspirated 87 octane gas mileage research
- result = 19.66 MPG 60/40 hwy/city*
Started monitoring normally aspirated gas mileage on 93 octane fuel
*all gas mileage figures were the average of 4 consecutive tanks of fuel running basically the same route over a 4 week period
Thursday, March 22, 2007
Completed research and found that there were two main issues to solve with
the Supercharger:
- the
engine runs extremely lean at higher RPMs with the stock fueling system
- at
high gear and low RPM there is pre-detonation (ping)
There are only three viable options to solve the fuel and timing problem.
1.
Install TRD's 7th injector kit
PROS:
- adds ~30RWHP to the Supercharged 3.4L motor
- maintains any factory warranties that might remain on the vehicle
CONS:
- not user programmable
- can run rich at lower RPMs and lean at higher RPMs
- very expensive
- does not include any fuel pump, spark plugs, or thermostat upgrades
2.
Install
URD's Fuel Upgrade Kit
PROS:
- adds ~30RWHP to the Supercharged 3.4L motor
- this is a complete kit and includes an upgraded fuel pump, cooler spark
plugs, injectors, cooler thermostat, and piggyback ECU
- user programmable options for timing and fueling
- less expensive and a better value for the money than TRD's 7th injector
kit
- allows for installation of a smaller Supercharger pulley for more horse
power
CONS:
- will affect any remaining factory warranty
- tuning can be time consuming
3. Install
URD's 7th Injector Kit
PROS:
- adds ~30RWHP to the Supercharged 3.4L motor
- this is a complete kit and includes an upgraded fuel pump, cooler spark
plugs, 7th injector, fuel line with t-fitting preassembled, cooler thermostat,
and piggyback ECU
- user programmable for timing and fueling
- less expensive than TRD's 7th injector or URD's Fuel Upgrade Kit
- easier to program than URD's Fuel Upgrade Kit
- easier to install than URD's Fuel Upgrade Kit
- provides some intercooling effect
CONS:
- I can't find any
The other issue is in regards to the
automatic transmission. The added horsepower of the Supercharger can cause
damage to the clutch plates, predominantly between 1st and 2nd gears. I've
also seen a couple of reports of overdrive being damaged as well if a smaller
than stock pulley is installed on the Supercharger. The solution to this
is to have the valve body upgraded. This is in essence a shift kit, only
the work has to be custom as there are no "shift kits" available for the
4Runner's automatic transmission. The main source to have this work done
is Import
Performance Transmissions in Wayne NJ.
PROS:
- IPT has done a lot of these upgrades and has experience with this
particular transmission
- increases shift timing and pressure for increased performance
- upgrades the transmission to handle the Superchargers power without
worry
CONS:
- owner must remove the valve body and ship it to IPT in NJ
- expensive
I visited a local transmission shop to check into having them pull the valve body for me to ship it to IPT. Removing the valve body is not a hard job, but it's VERY messy and I'd rather not take a shower in ATF. The local transmission shop said they could do the same upgrade to my valve body for half of what IPT charges, including uninstalling and re-installing the valve body, and I'd save shipping to boot. I'm still considering this and will talk to this local tranny shop again once I've completed all other aspects of the Supercharger install.
I will also install a transmission cooler to further keep the transmission healthy. This is something worthwhile even for a stock 4Runner. I will use a Tru-Cool model 4454 which is a low pressure drop cooler. This cooler allows fluid to flow through the stock cooling system when the fluid is cold, then once up to operating temperature it flows through the additional 4454 cooler. This prevents the fluid from being over cooled, or taking more time to reach operating temperature.
Several gauges are recommended, the most important of which is an Air Fuel Ratio (AFR) gauge. This requires an additional wide band sensor be placed in the exhaust stream before the first catalytic converter and a gauge to read the sensor's output. The other gauges of importance are a transmission temperature gauge, and finally a boost gauge which is more fun to look at than useful. I decided to use an LC-1 wide band married to a Nordskog digital AFR gauge custom made to match my dash lighting with green LEDs, and a silver bezel to match the Auto Meter Sport-Comp II boost and transmission temperature gauges I plan to use.
Tuesday, March 20, 2007
Purchased brand new TRD Supercharger with dynamic belt tensioner (4th
generation)
Saturday, March 3, 2007
Began shopping for a TRD Supercharger
Monday, February 26, 2007
Started monitoring gas mileage normally aspirated on 87 octane fuel
Monday, February 12, 2007
Began considering a Supercharger for Project SportRunner; started
researching what was required to make the supercharger function properly and
maintain engine longevity